

NestJS, TypeORM 이해하기
Table of Content

1. File Input/Output이란?

FIle I/O
•
파일 I/O는 서버와 파일 시스템 간의 데이터 흐름을 처리하는 중요한 기능 중 하나
•
특히 파일 업로드/다운로드, 로그 기록, 데이터 백업과 같은 작업에서 많이 사용
파일 시스템에서의 I/O와 HTTP 환경에서의 I/O는 다르다.
•
파일 시스템 I/O:
◦
직접적으로 디스크의 파일을 읽고 쓰는 작업.
◦
파일 경로와 파일 시스템의 상태에 따라 작업이 이루어짐.
◦
메모리와 디스크의 물리적 위치에 의존.
관련 모듈
•
HTTP I/O:
◦
네트워크를 통한 클라이언트와 서버 간의 데이터 전송.
◦
multipart/form-data 형식의 요청 본문을 처리하여 파일 업로드 및 다운로드를 수행.
◦
스트리밍 처리와 같은 네트워크 효율성을 고려한 데이터 처리 방식.
2. Multipart/form-data란?
HTTP 환경에서의 I/O를 위한 multipart/form-data 에 대한 이해
•
HTTP 요청의 본문(body)에 여러 개의 데이터를 포함할 수 있는 형식
•
주로 웹 폼에서 파일 업로드와 같은 복잡한 데이터 구조를 전송할 때 사용
•
HTTP는 기본적으로 문자열을 전송하는 프로토콜이다.
◦
“Hello” 라는 문자는 단순하게 문자라는 것 이외에 정보는 필요 없다. 따라서 단순히 인코딩하여 HTTP로 문자를 보낼 수 있다.
◦
그런데 사진, 영상, 음원과 같은 복잡한 파일은 요약하면 다음처럼 구성된다.
▪
제목, 확장자, 타입과 같은 파일에 대한 메타 데이터
Content-Disposition: form-data; name="file"; filename="video.mp4"
Content-Type: video/mp4
Plain Text
복사
▪
실제 영상이나 그림(0,1로 구성된 원시 비트 Binary 상태로 존재) 파일 데이터
01000001 01100010 01100100 00101100 01000100 00100111 ...
Plain Text
복사
◦
이처럼 복잡한 구조의 파일을 HTTP에 담아서 전송, 응답처리하기 위해서는 이를 구별할 수 있는 어떠한 형식이 필요했으며 그것이 multipart/form-data 양식이라고 볼 수 있다.
◦
여기에 위 파트를 구분하기 위한 경계(Boundary)는 ASCII 텍스트로 구분
▪
각 파트의 시작 --boundary , 본문의 끝 --boundary--로 표현
◦
어떤 2개의 파일이 담겨 있다면 실제 형태는 아래와 같다.
--boundary
Content-Disposition: form-data; name="file1"; filename="video1.mp4"
Content-Type: video/mp4
01000001 01100010 01100100 00101100 01000100 00100111 ...
--boundary
Content-Disposition: form-data; name="file2"; filename="video2.mp4"
Content-Type: video/mp4
01000001 01100010 01100100 00101100 01000100 00100111 ...
--boundary--
Plain Text
복사
3. Multer 라이브러리
Node.js 환경(NestJS 포함)에서 파일 업로드를 처리하기 위한 미들웨어 라이브러리 Multer


•
Multer는 multipart/form-data 형식으로 전송된 파일을 처리하고, 서버의 파일 시스템에 저장하거나 메모리에 보관하는 기능을 제공
•
파일을 서버의 로컬 파일 시스템에 저장하거나, 메모리에 보관하는 등 저장 옵션을 설정 가능
◦
필요에 따라 외부, Cloud 환경(AWS S3 등)과 연결 할 수 있음
•
업로드된 파일의 크기 제한, 필터링, 파일 저장 경로 설정 등 다양한 옵션 제공
•
내부적으로 Node.js의 내장 모듈인 fs 을 활용하여 복잡한 파일 처리 로직, 파일 시스템과 상호작용을 편리하게 사용 할 수 있도록 구성된 라이브러리라고 이해하면 된다.
4. NestJS 프로젝트에서 파일 I/O 구현


4.1 환경 구축
Multer 라이브러리와 관련 라이브러리 모듈 설치
•
파일 업로드를 처리하는 실제 라이브러리 multer 설치
npm install multer
Shell
복사

•
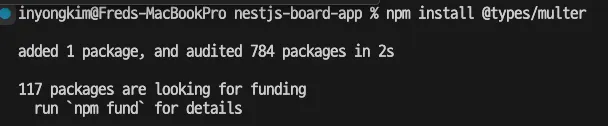
TypeScript를 사용하는 경우 multer의 타입 정의 라이브러리 설치
npm install @types/multer
Shell
복사
•
Express 기반의 서버와 함께 Multer를 설정 할 수있는 라이브러리 설치
npm install @nestjs/platform-express
Shell
복사

4.2 File 리소스 구조 생성
파일은 별도 리소스로 구분하고자 한다.
•
현재 기획중인 파일의 용도는 다음과 같다.
◦
회원의 프로필 사진
◦
게시글의 사진, 영상
•
따라서 File을 게시글이나 회원에 포함시키는 것 보다는 별도 리소스로 구분하고 각 엔터티에 연관관계를 맺으려고 한다.
file 리소스 폴더 생성
•
nestjs/cli 명령어를 통해 기본 구조를 생성
nest g resource file --no-spec
Shell
복사
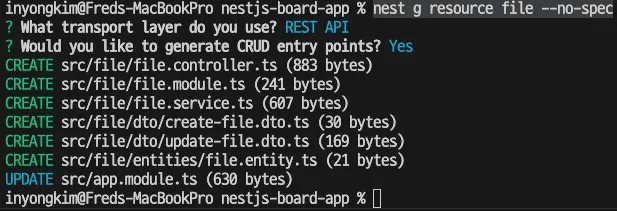
•
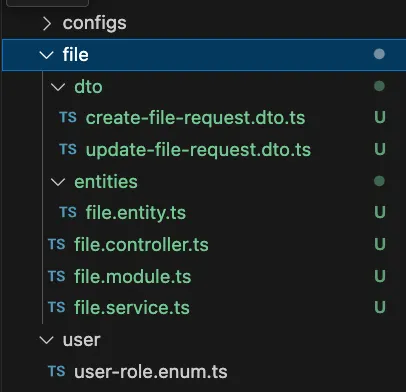
자동 생성된 파일명 컨벤션 통일
◦
create-file.dto.ts → create-file-request.dto.ts로 변경
◦
update-file.dto.ts → update-file-request.dto.ts로 변경
4.3 엔터티 설계
file.entity.ts
•
파일에 필요한 필드는 다음과 같다.
◦
id : 파일 번호
◦
filename : 파일 이름
◦
mimetype : 파일의 유형(jpg, mp4 등)
◦
path : 파일의 경로
◦
size : 파일의 크기
◦
fileType : 파일의 종류 ENUM 클래스
◦
createAt : 파일 생성 시간
◦
updatedAt : 파일 수정 시간
•
공통 부분으로 id, createAt, updateAt 필드는 BaseEntity 를 상속받아서 생성된다.
•
회원 프로필 사진을 위해서 파일과 유저는 N:1 연관관계를 가진다.
◦
@ManyToOne
•
게시글 사진 및 영상 등을 위해서 파일과 게시글은 N:1 연관관계를 가진다.
◦
@ManyToOne
import { Article } from "src/article/article.entity";
import { BaseEntity } from "src/common/base.entity";
import { User } from "src/user/user.entity";
import { Column, Entity, ManyToOne } from "typeorm";
import { FileType } from "./file-type.enum";
@Entity()
export class File extends BaseEntity {
@Column()
filename: string;
@Column()
mimetype: string;
@Column()
path: string;
@Column()
size: number;
@Column()
fileType: FileType;
@ManyToOne(() => User, user => user.files, { eager: false })
user: User;
@ManyToOne(() => Article, article => article.files, { eager: false })
article: Article;
}
TypeScript
복사
file-type.enum.ts
•
파일 종류 구분
◦
PROFILE : 프로필 사진파일
◦
DOCUMENT : 게시글 문서파일
◦
IMAGE : 게시글 이미지파일
◦
VIDEO : 게시글 영상파일
export enum FileType {
PROFILE = 'PROFILE',
DOCUMENT = 'DOCUMENT',
IMAGE = 'IMAGE',
VIDEO = 'VIDEO'
}
Shell
복사
article.entity.ts
•
게시글과 파일은 1:N 관계를 가지게 된다.
◦
@OneToMany
user.entity.ts
•
회원과 파일은 1:N 관계를 가진다.
◦
@OneToMany
import { Column, Entity, OneToMany, PrimaryGeneratedColumn } from "typeorm";
import { Article } from "src/article/article.entity";
import { UserRole } from "./user-role.enum";
import { BaseEntity } from "src/common/base.entity";
import { File } from "src/file/entities/file.entity";
@Entity()
export class User extends BaseEntity{
@Column()
username: string;
@Column()
password: string;
@Column({ unique: true })
email: string;
@Column({ default: UserRole.USER })
role: UserRole;
@Column({ nullable: true })
postalCode: string;
@Column({ nullable: true })
address: string;
@Column({ nullable: true })
detailAddress: string;
@OneToMany(() => Article, article => article.author, { eager: false })
articles: Article[];
@OneToMany(() => File, file => file.user, { eager: false })
files: File[];
}
TypeScript
복사
4.4 파일 업로드 비지니스 로직 구현
file.service.ts
•
파일을 업로드하는 uploadFile() 메서드 구현
◦
파일 업로드 경로 폴더 지정(없으면 디렉토리 생성)
◦
파라미터로 Multer 파일을 전달받음
◦
fs.writeFile() 파일 시스템 함수를 통해서 파일을 저장
import { Injectable, HttpException, HttpStatus } from '@nestjs/common';
import { promises as fs } from 'fs';
import * as path from 'path';
@Injectable()
export class FileService {
private uploadPath = '/Users/inyongkim/Documents/Projects/localStorage';
constructor() {
// 저장 경로가 존재하지 않으면 폴더를 생성
this.ensureUploadPathExists();
}
async ensureUploadPathExists() {
try {
await fs.mkdir(this.uploadPath, { recursive: true });
} catch (err) {
throw new HttpException('Failed to create upload directory', HttpStatus.INTERNAL_SERVER_ERROR);
}
}
// 파일 업로드
async uploadFile(file: Express.Multer.File) {
const filePath = path.join(this.uploadPath, file.originalname);
try {
await fs.writeFile(filePath, file.buffer); // 파일 저장
return { message: 'File uploaded successfully', filePath };
} catch (err) {
throw new HttpException('Failed to upload file', HttpStatus.INTERNAL_SERVER_ERROR);
}
}
...
}
TypeScript
복사
4.5 테스트 코드를 통한 비지니스 로직 확인
파일 업로드 테스트
•
현재 파일 업로드 메서드는 구성했지만 실제로 파일 파라미터로 전달된다면 로컬 저장소로 저장되는지 확인 하기 어렵다.
•
프론트엔드 구성과 컨트롤러 등 모두 구현이 완료되기 까지 오랜 시간이 걸릴 수도 있으므로 기본적인 파일 업로드 테스트를 진행해본다.
•
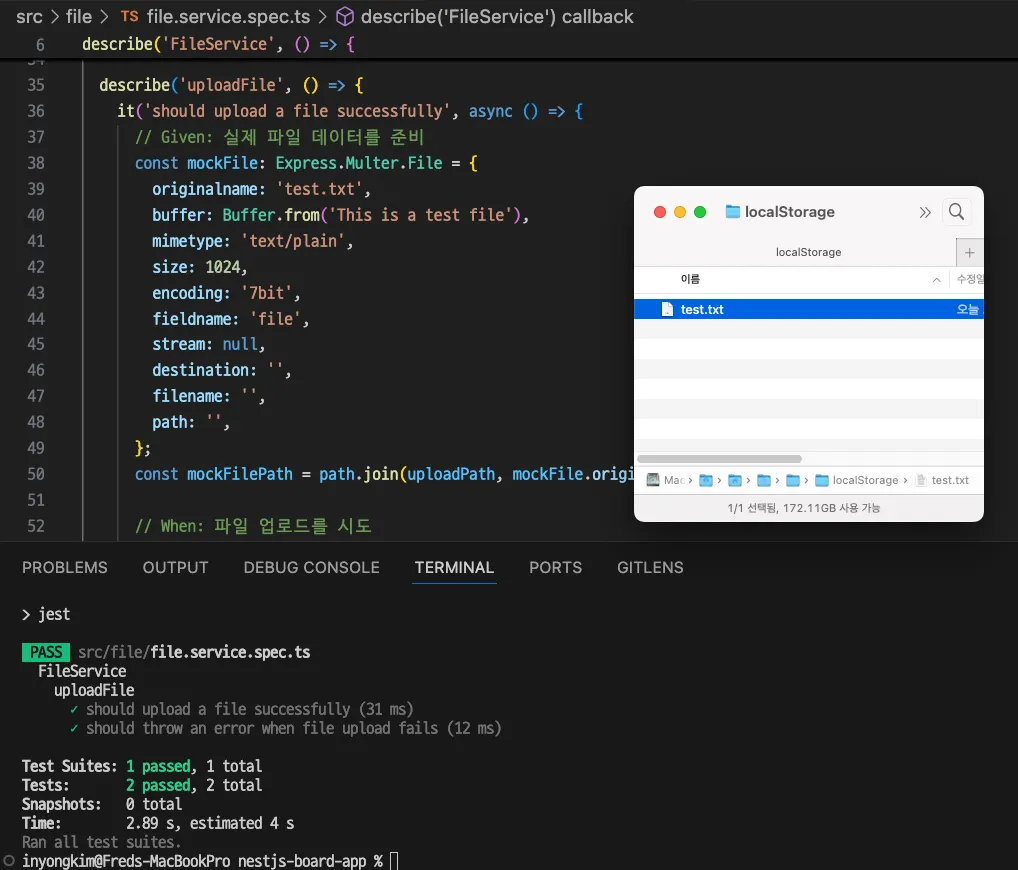
Mock(가짜) 객체를 통한 테스트는 실제 파일이 남지 않기 때문에 해당 테스트 코드는 실제 파일이 생성되는지 확인하고자 한다.
•
file.service.spec.ts
◦
given/when/then 패턴으로 테스트 코드를 작성한다.
import { Test, TestingModule } from '@nestjs/testing';
import { FileService } from './file.service';
import { promises as fs } from 'fs';
import * as path from 'path';
describe('FileService', () => {
let service: FileService;
const uploadPath = '/Users/inyongkim/Documents/Projects/localStorage';
beforeEach(async () => {
const module: TestingModule = await Test.createTestingModule({
providers: [FileService],
}).compile();
service = module.get<FileService>(FileService);
service['uploadPath'] = uploadPath; // 경로 설정
});
afterEach(async () => {
// 테스트 후 생성된 파일 삭제
try {
const files = await fs.readdir(uploadPath);
for (const file of files) {
await fs.unlink(path.join(uploadPath, file));
}
} catch (err) {
// 파일 삭제 중 오류가 발생하면 무시
console.error('Failed to clean up files:', err);
}
});
describe('uploadFile', () => {
beforeEach(async () => {
// 업로드 디렉토리가 존재하지 않을 경우 생성
await fs.mkdir(uploadPath, { recursive: true });
});
it('should upload a file successfully', async () => {
// Given: 실제 파일 데이터를 준비
const mockFile: Express.Multer.File = {
originalname: 'test.txt',
buffer: Buffer.from('This is a test file'),
mimetype: 'text/plain',
size: 1024,
encoding: '7bit',
fieldname: 'file',
stream: null,
destination: '',
filename: '',
path: '',
};
const mockFilePath = path.join(uploadPath, mockFile.originalname);
// When: 파일 업로드를 시도
const result = await service.uploadFile(mockFile);
// Then: 파일 업로드가 성공했는지 확인
expect(result).toEqual({
message: 'File uploaded successfully',
filePath: mockFilePath,
});
// 파일이 실제로 생성되었는지 확인
const fileExists = await fs.stat(mockFilePath).then(() => true).catch(() => false);
expect(fileExists).toBe(true);
});
it('should throw an error when file upload fails', async () => {
// Given: Mock 파일과 실패 시나리오 준비
const mockFile: Express.Multer.File = {
originalname: 'test.txt',
buffer: Buffer.from('This is a test file'),
mimetype: 'text/plain',
size: 1024,
encoding: '7bit',
fieldname: 'file',
stream: null,
destination: '',
filename: '',
path: '',
};
jest.spyOn(fs, 'writeFile').mockRejectedValue(new Error('Failed to upload'));
// When: 파일 업로드가 실패할 때
// Then: 오류가 발생하는지 확인
await expect(service.uploadFile(mockFile)).rejects.toThrow('Failed to upload file');
});
});
describe('ensureUploadPathExists', () => {
it('should create upload directory if it does not exist', async () => {
// Given: 업로드 경로가 존재하지 않도록 Mock 설정
jest.spyOn(fs, 'mkdir').mockResolvedValue(undefined);
// When: ensureUploadPathExists 메서드를 호출
await service.ensureUploadPathExists();
// Then: mkdir가 호출되었는지 확인
expect(fs.mkdir).toHaveBeenCalledWith(uploadPath, { recursive: true });
});
it('should throw an error if directory creation fails', async () => {
// Given: 업로드 경로 생성 실패 시나리오
jest.spyOn(fs, 'mkdir').mockRejectedValue(new Error('Failed to create directory'));
// When: ensureUploadPathExists 메서드를 호출
// Then: 오류가 발생하는지 확인
await expect(service.ensureUploadPathExists()).rejects.toThrow('Failed to create upload directory');
});
});
});
TypeScript
복사
◦
아래 명령어로 실행
npx jest
Shell
복사
또는
npm run test
Shell
복사
◦
테스트 코드 실행 화면
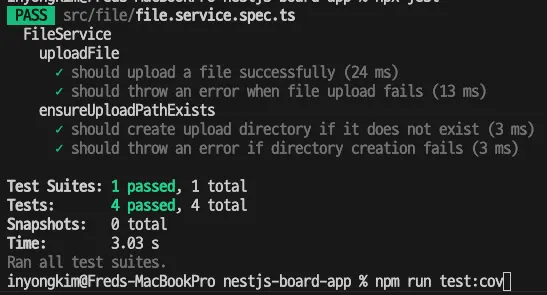
◦
실제 파일이 생성 되는 것을 확인 할 수 있다.(afterEach 부분 주석처리 필요)
◦
이 테스트 코드가 file.service.ts의 전체 코드를 검증하는지 확인하려면 커버리지를 확인해야 한다.
◦
테스트코드 커버리지 검사는 아래 명령어로 실행
npx jest --coverage
Shell
복사
또는
npm run test:cov
Shell
복사
◦
테스트에 검증되지 않은 라인을 확인 할 수 있다.

◦
해당 부분의 코드도 테스트 코드를 추가하여 추가 검증해주면 커버리지를 100%로 맞출 수 있다.
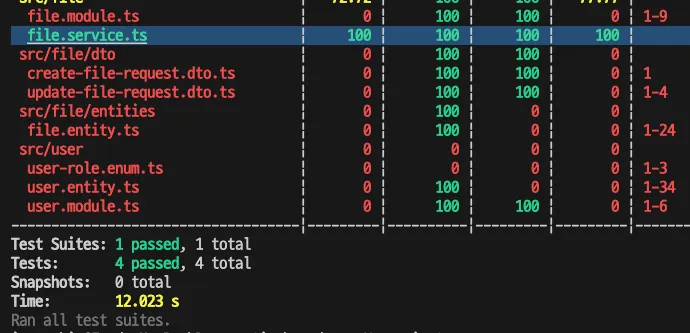
4.6 회원 프로필 사진 업로드(Input)
4.6.1 Backend API 서버 구현
파일 업로드 메서드를 작성했으니 필요한 부분에서 해당 메서드를 호출하여 실제로 파일 업로드 기능을 실행해야 한다.
•
우선 회원 가입 시 프로필 사진을 업로드 하는 것부터 시도하고자 한다.
•
전체적인 흐름은 다음과 같다
◦
파일을 담은 요청 → 컨트롤러 → 프로필 중간 서비스 → 파일, 유저 각 DB, 시스템 저장 서비스
auth.controller.ts
•
회원 가입 시 파일 업로드 요청을 시작하는 부분이다.
•
@UseInterceptors(FileInterceptor('profilePicture'))
◦
인터셉터는 요청과 응답을 가로채어 전처리 또는 후처리 하는 역할
◦
NestJS에서 파일 업로드를 처리하기 위해 사용하는 인터셉터 데코레이터로 보면 된다.
◦
그 중 FileInterceptor를 사용하여 업로드되어 요청으로 오는 파일을 처리
▪
메타데이터(파일명, MIME 타입, 크기 등)를 추출
▪
Multer라는 미들웨어를 사용하여 파일을 파싱하고 처리
•
@UploadedFile()
◦
이 데코레이터를 통해 FileInterceptor 를 통해 요청에서 전송된 파일을 핸들러 메서드의 매개변수로 받는 역할
•
file과 user 정보를 전달하며 서비스 계층의 uploadProfilePicture(file, user.id)메서드 호출
import { Body, Controller, Get, Logger, Post, Query, Req, Res, UseGuards, UseInterceptors, UploadedFile } from '@nestjs/common';
import { Response } from 'express';
import { AuthService } from './auth.service';
import { SignUpRequestDto } from './dto/sign-up-request.dto';
import { User } from "src/user/user.entity";
import { SignInRequestDto } from './dto/sign-in-request.dto';
import { AuthGuard } from '@nestjs/passport';
import { GetUser } from './get-user.decorator';
import { UserResponseDto } from './dto/user-response.dto';
import { ApiResponse } from 'src/common/api-response.dto';
import { ProfileService } from 'src/file/profile-file.service';
import { FileInterceptor } from '@nestjs/platform-express';
@Controller('api/auth')
export class AuthController {
private readonly logger = new Logger(AuthController.name); // Logger 인스턴스
constructor(private authService: AuthService, private profileService: ProfileService){}
// 회원 가입 기능
@Post('/signup')
@UseInterceptors(FileInterceptor('profilePicture'))
async signUp(@Body() signUpRequestDto: SignUpRequestDto, @UploadedFile() file: Express.Multer.File): Promise<ApiResponse<UserResponseDto>> {
this.logger.verbose(`Attempting to sign up user with email: ${signUpRequestDto.email}`);
const user = await this.authService.signUp(signUpRequestDto);
if (file) {
await this.profileService.uploadProfilePicture(file, user.id);
}
const userResponseDto = new UserResponseDto(user);
this.logger.verbose(`User signed up successfully: ${JSON.stringify(userResponseDto)}`);
return new ApiResponse(true, 201, 'User signed up successfully', userResponseDto);
}
...
}
TypeScript
복사
profile-file.service.ts
•
컨트롤러로부터 처음 파일과 회원 정보가 도착하는 곳이다.
•
해당 부분에서 각 최하위 로직을 호출하기 때문에 FileService, UserService 모두 주입받게 된다.
◦
파라미터로 전달받은 파일을 fileService.uploadFile(file) 를 통해 파일 자체를 실제 시스템에 저장하도록 호출
◦
파라미터로 전달받은 회원번호와 파일의 정보들을 파일 테이블에 저장
▪
user.id를 통해 회원의 정보를 파일에 저장하며 해당 회원과 파일의 연관관계가 맺어짐
// profile-file.service.ts
import { Injectable } from '@nestjs/common';
import { FileService } from './file.service';
import { UserService } from 'src/user/user.service';
import { FileType } from './entities/file-type.enum';
import { File } from './entities/file.entity';
@Injectable()
export class ProfileService {
constructor(
private readonly fileService: FileService,
private readonly userService: UserService,
) {}
async uploadProfilePicture(file: Express.Multer.File, id: number) {
// 파일 업로드
const result = await this.fileService.uploadFile(file);
const filePath = result.filePath;
// 파일 메타데이터 저장
const newFile = new File();
newFile.path = result.filePath;
newFile.filename = result.filename;
newFile.mimetype = result.mimetype;
newFile.size = result.size;
newFile.fileType = FileType.PROFILE;
newFile.user = await this.userService.findOneById(id);
// 파일 엔터티를 데이터베이스에 저장
await this.fileService.save(newFile);
return result;
}
}
TypeScript
복사
file.service.ts
•
프로필 서비스로부터 파일을 전달 받고 실제 로컬 저장소에 파일을 저장하는 부분
•
uploadFile(file: Express.Multer.File)
◦
해당 메서드는 전달받은 파일을 실제 저장소에 저장하는 로직
◦
fs.write() 함수를 통해 시스템에 파일이 작성 됨
•
save(file: File)
◦
해당 메서드는 파일의 정보들을 데이터베이스에 저장하는 로직
import { Injectable, HttpException, HttpStatus } from '@nestjs/common';
import { promises as fs } from 'fs';
import * as path from 'path';
import { File } from './entities/file.entity';
import { InjectRepository } from '@nestjs/typeorm';
import { Repository } from 'typeorm';
@Injectable()
export class FileService {
private uploadPath = '/Users/inyongkim/Documents/Projects/localStorage';
constructor(
@InjectRepository(File)
private readonly fileRepository: Repository<File>
) { this.ensureUploadPathExists(); }
async ensureUploadPathExists() {
try {
await fs.mkdir(this.uploadPath, { recursive: true });
} catch (err) {
throw new HttpException('Failed to create upload directory', HttpStatus.INTERNAL_SERVER_ERROR);
}
}
// 파일 로컬 저장소 저장
async uploadFile(file: Express.Multer.File) {
const filePath = path.join(this.uploadPath, file.originalname);
try {
await fs.writeFile(filePath, file.buffer); // 파일 저장
return {
message: 'File uploaded successfully',
filePath,
filename: file.originalname,
mimetype: file.mimetype,
size: file.size,
};
} catch (err) {
throw new HttpException('Failed to upload file', HttpStatus.INTERNAL_SERVER_ERROR);
}
}
// 파일 엔터티 데이터베이스에 저장
async save(file: File) {
try {
return await this.fileRepository.save(file);
} catch (err) {
throw new HttpException('Failed to save file', HttpStatus.INTERNAL_SERVER_ERROR);
}
}
...
}
TypeScript
복사
4.6.2 Frontend 샘플 구현 및 버그 픽스
실제 작동 상태를 점검해야 하기 때문에 프론트엔드 기본 구성을 진행하고 테스트로 버그를 찾아내려 한다.
•
회원가입 시 파일 업로드 기능 추가
◦
파일 업로드 없을 시, 기본 이미지로 대체

기본 이미지 샘플
signup.component.html
•
파일 업로드를 위해서는 file 타입 속성의 input 필드가 필요하다.
◦
<input type="file">: 파일 선택 시 onFileChange($event) 메서드 호출.
...
<!-- Detail Address Input (Optional) -->
<ion-item>
<ion-label position="floating">Detail Address</ion-label>
<ion-input type="text" [(ngModel)]="detailAddress" name="detailAddress" maxlength="100"></ion-input>
</ion-item>
<!-- Profile Picture Input -->
<ion-item>
<ion-label>Profile Picture</ion-label>
<input type="file" (change)="onFileChange($event)">
</ion-item>
<!-- Sign Up Button -->
<ion-button expand="full" type="submit">Sign Up</ion-button>
</form>
...
TypeScript
복사
signup.component.ts
•
HTML 사용자 입력 폼에 입력된 각 필드 값들을 formData 객체에 할당
◦
사용자의 입력
◦
username, password, email, role, postalCode, address, detailAddress를 FormData 객체에 append 메서드를 사용해 추가
•
onFileChange(event: any) 메서드를 통해 선택된 프로필 사진(profilePicture)이 있는 경우에도 FormData에 추가
import { Component } from '@angular/core';
import { AuthService } from '../auth.service';
import { UserRole } from '../../models/common/user-role.enum';
import { Router } from '@angular/router';
@Component({
selector: 'app-signup',
templateUrl: './signup.component.html',
styleUrls: ['./signup.component.scss'],
})
export class SignUpComponent {
username: string = '';
password: string = '';
passwordConfirm: string = '';
email: string = '';
role: UserRole = UserRole.USER;
postalCode: string = '';
address: string = '';
detailAddress: string = '';
profilePicture: File | null = null;
constructor(private authService: AuthService, private router: Router) {}
onSignUp() {
if (this.password !== this.passwordConfirm) {
console.error('Passwords do not match');
return;
}
// FormData를 사용하여 데이터를 서버로 전송
const formData = new FormData();
formData.append('username', this.username);
formData.append('password', this.password);
formData.append('email', this.email);
formData.append('role', this.role);
formData.append('postalCode', this.postalCode);
formData.append('address', this.address);
formData.append('detailAddress', this.detailAddress);
// 프로필 사진이 선택된 경우 FormData에 추가
if (this.profilePicture) {
formData.append('profilePicture', this.profilePicture);
}
// 회원가입 API 호출
this.authService.signUp(formData).subscribe({
next: response => {
if (response.success) {
console.log('Sign Up successful:', response.data);
this.router.navigate(['auth']);
} else {
console.error('Sign Up failed:', response.message);
}
},
error: err => {
console.error('Sign Up error:', err);
},
complete: () => {
console.log('Sign Up request completed.');
}
});
}
// 파일 선택 시 호출되는 메서드
onFileChange(event: any) {
const file = event.target.files[0];
if (file) {
this.profilePicture = file;
}
}
}
TypeScript
복사
auth.service.ts
•
회원 가입 시 파일 데이터를 담는 기능이 추가되었다.
◦
따라서 데이터는 body에 기존 application/json 타입에서 multipart/form-data 형식으로 변경되어 전송된다.
•
회원가입 메서드signUp(formData: FormData): Observable<AuthResponse>formData
◦
컴포넌트가 사용자 입력 데이터를 추출하여 formData 객체에 담아두었었고, Service의 signUp() 메서드에 인수로 전달했다.
◦
따라서 Service계층의 signUP(formData) 메서드에서는 formData를 파라미터(인자)로 메서드 실행부에 전달한다.
▪
FormData 객체를 HttpClient를 통해 API URL로 전송하게 된다.
▪
this.http.post 회원가입 요청을 서버에 POST 방식으로 전송, 응답으로 AuthResponse를 반환
import { Injectable } from '@angular/core';
import { HttpClient, HttpHeaders } from '@angular/common/http';
import { Observable } from 'rxjs';
import { SignInRequestData } from '../models/auth/auth-signin-request-data.interface';
import { AuthResponse } from '../models/auth/auth-response.interface';
@Injectable({
providedIn: 'root'
})
export class AuthService {
private apiUrl = 'http://localhost:3000/api/auth';
constructor(private http: HttpClient) { }
signUp(formData: FormData): Observable<AuthResponse> {
return this.http.post<AuthResponse>(`${this.apiUrl}/signup`, formData, { withCredentials: true });
}
signIn(signInRequestData: SignInRequestData): Observable<AuthResponse> {
const headers = new HttpHeaders({ 'Content-Type': 'application/json' });
return this.http.post<AuthResponse>(`${this.apiUrl}/signin`, signInRequestData, { headers, withCredentials: true });
}
}
TypeScript
복사
•
브라우저를 통한 테스트
◦
프로필 사진을 첨부한 경우 회원가입
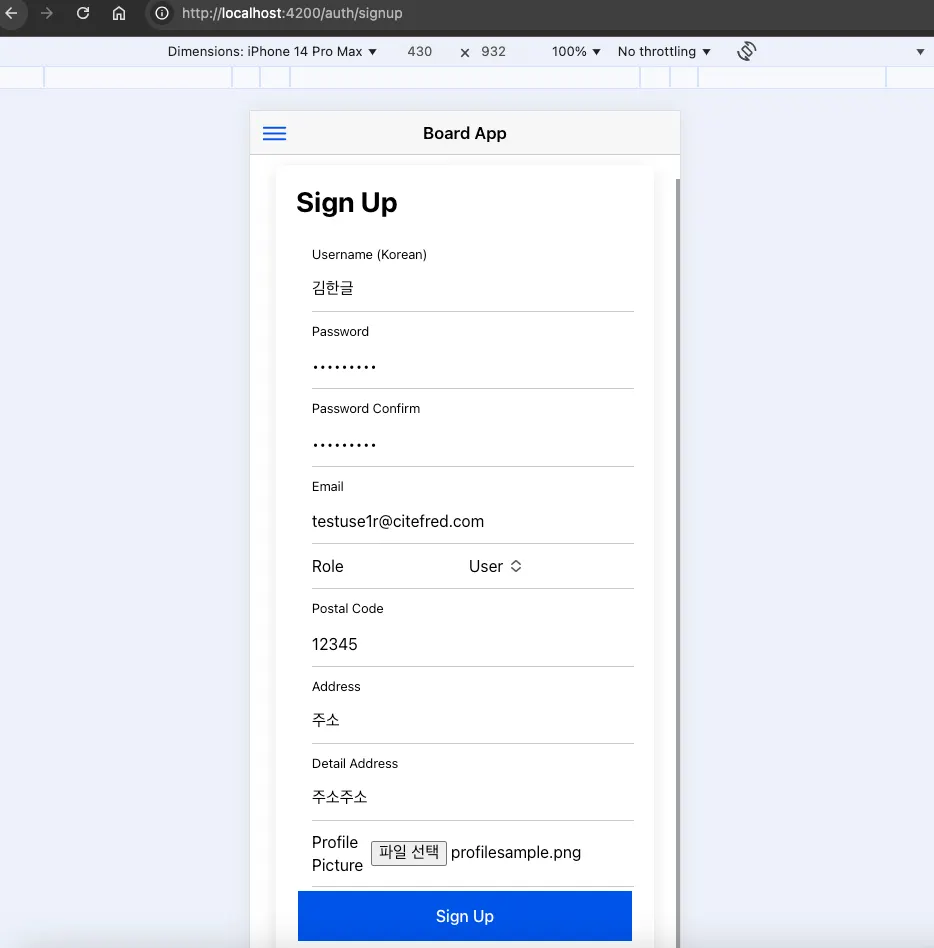
◦
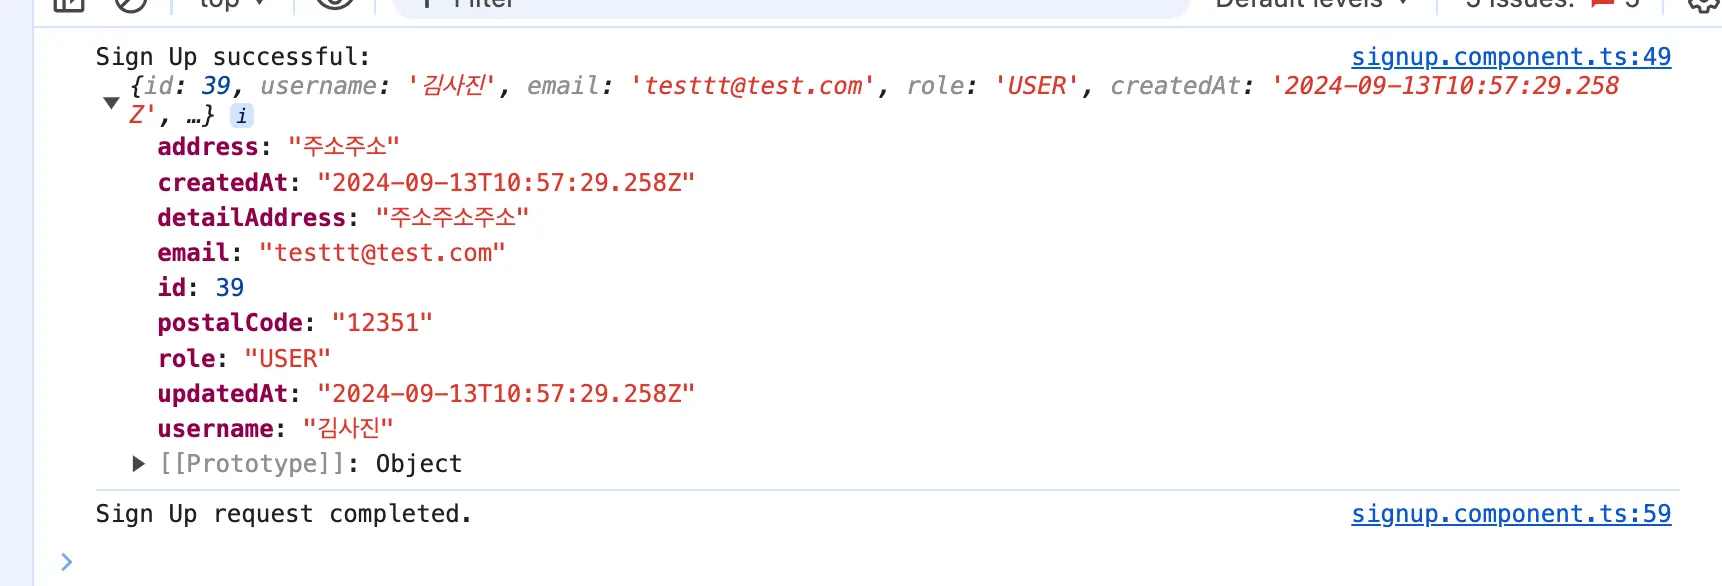
회원 가입 성공 로그

◦
기존 User 객체가 데이터베이스에 삽입되는 것은 이상이 없다.
◦
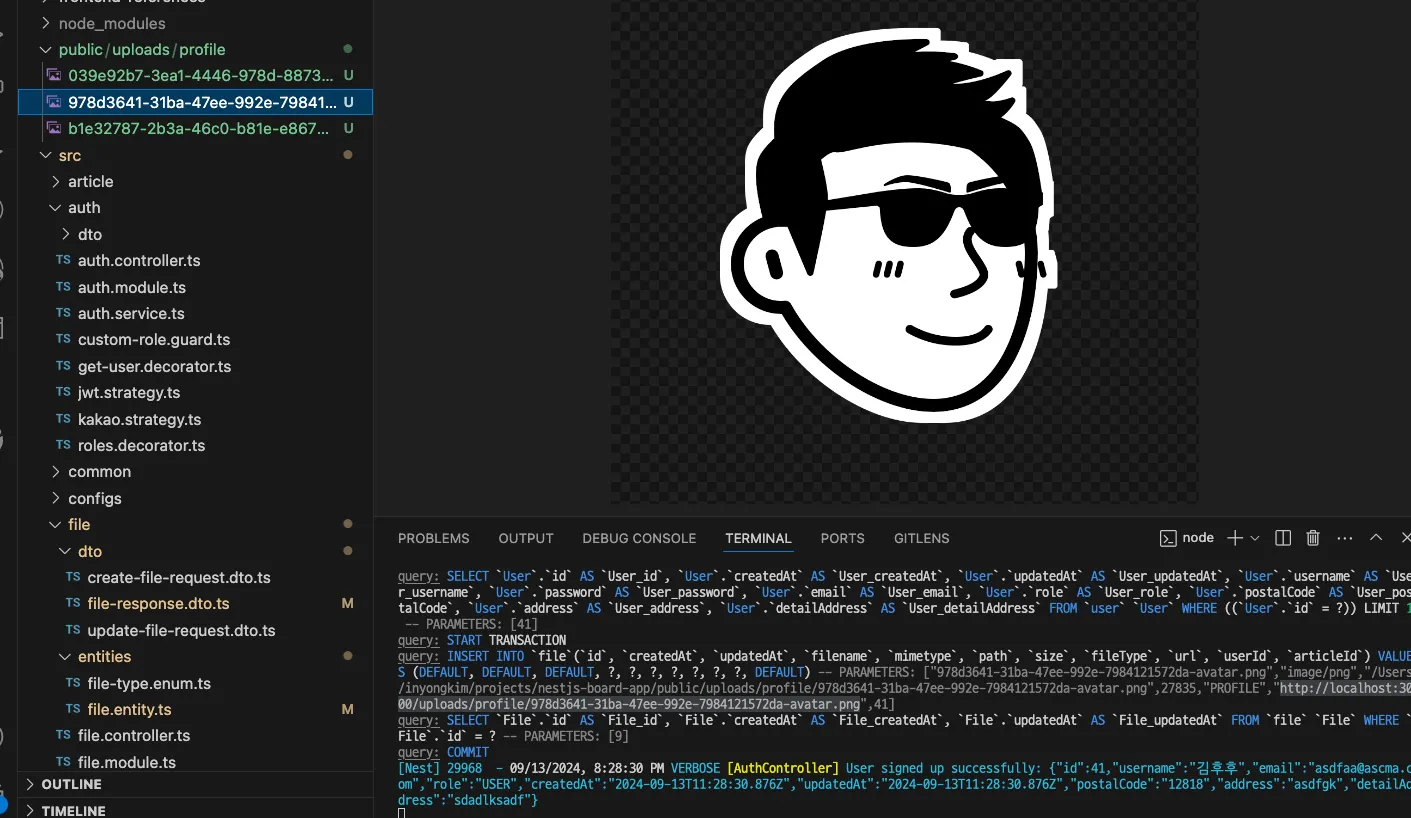
새로운 File 객체가 데이터베이스에 삽입되는 쿼리를 확인 할 수 있다.
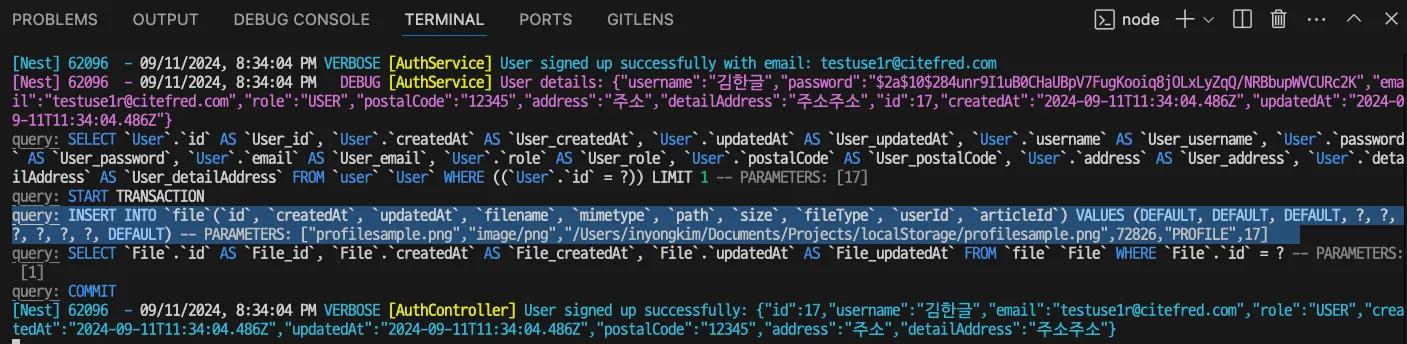
◦
실제 지정한 시스템 파일 저장 경로에 파일이 생성 되는 것을 볼 수 있다.
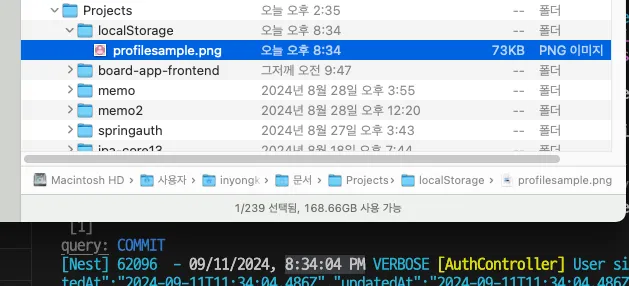
◦
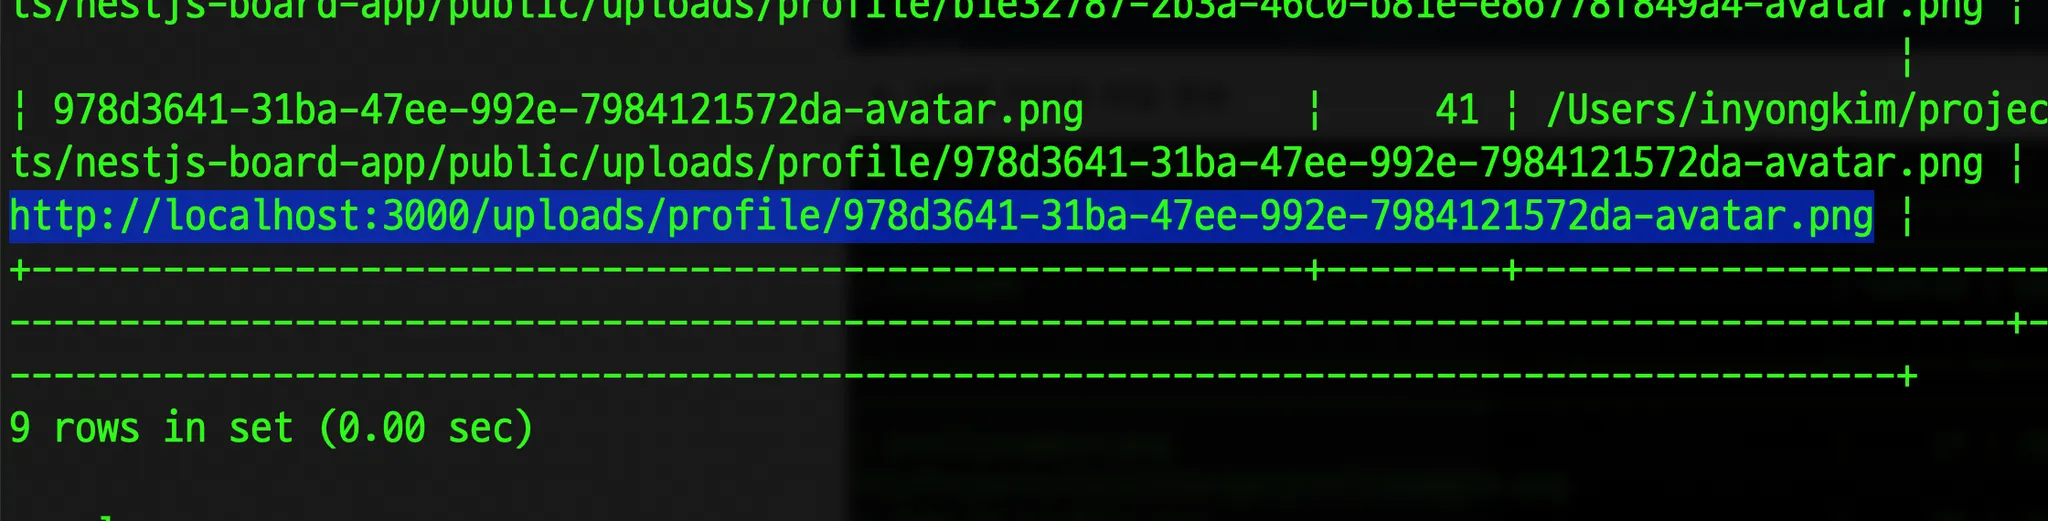
데이터베이스 조회로 파일의 정보가 저장된 것을 확인

기본 프로필 사진 업로드 추가 및 파일의 고유 번호 추가
•
회원가입 시 프로필 사진을 업로드 하지 않는 경우에 대한 처리도 필요하다.
•
파일 첨부를 하지 않는 경우 기본 프로필 사진을 업로드하는 로직으로 변경했다.
•
이는 백엔드에서 입력 파일이 없는 경우에 대해 처리해주는것이 간편하다.
◦
auth.controller.ts
▪
프로필 사진을 업로드 하지 않는 경우 요청으로부터 전달받는 file 객체가 없을 것이다.
▪
기존 uploadProfilePicture(file, user.id) 메서드의 조건을 추가하는 방법도 있지만 코드 자체가 조건문으로 가독성이 매우 떨어졌었다.
▪
...
@Controller('api/auth')
export class AuthController {
private readonly logger = new Logger(AuthController.name); // Logger 인스턴스
constructor(private authService: AuthService, private profileService: ProfileService){}
// 회원 가입 기능
@Post('/signup')
@UseInterceptors(FileInterceptor('profilePicture'))
async signUp(@Body() signUpRequestDto: SignUpRequestDto, @UploadedFile() file: Express.Multer.File): Promise<ApiResponse<UserResponseDto>> {
this.logger.verbose(`Attempting to sign up user with email: ${signUpRequestDto.email}`);
const user = await this.authService.signUp(signUpRequestDto);
if (file) {
await this.profileService.uploadProfilePicture(file, user.id);
} else {
await this.profileService.uploadDefaultProfilePicture(user.id);
}
const userResponseDto = new UserResponseDto(user);
this.logger.verbose(`User signed up successfully: ${JSON.stringify(userResponseDto)}`);
return new ApiResponse(true, 201, 'User signed up successfully', userResponseDto);
}
...
}
TypeScript
복사
•
profile-file.service.ts
◦
Controller에서 첨부된 파일에따라 별도의 비지니스 로직을 타도록 구성했다.
▪
첨부된 파일이 있는 경우, uploadProfilePicture()
▪
첨부된 파일이 없는 경우, uploadDefaultProfilePicture()
import { Injectable } from '@nestjs/common';
import { FileService } from './file.service';
import { UserService } from 'src/user/user.service';
import { FileType } from './entities/file-type.enum';
import { File } from './entities/file.entity';
@Injectable()
export class ProfileService {
constructor(
private readonly fileService: FileService,
private readonly userService: UserService,
) {}
// 회원 가입 프로필 사진 업로드
async uploadProfilePicture(file: Express.Multer.File, id: number) {
// 파일 업로드(사용자 프로필 사진 첨부 사용)
const result = await this.fileService.uploadFile(file);
// 파일 메타데이터 저장
const newFile = await this.createFileMetadata(result, id);
// 파일 엔터티를 데이터베이스에 저장
await this.fileService.save(newFile);
return result;
}
// 기본 프로필 처리(회원가입 사진 미업로드)
async uploadDefaultProfilePicture(id: number) {
// 파일 업로드(프로필 미첨부 기본 프로필 사진 사용)
const result = await this.fileService.uploadDefaultProfilePictureFile();
// 파일 메타데이터 저장
const newFile = await this.createFileMetadata(result, id);
// 파일 엔터티를 데이터베이스에 저장
await this.fileService.save(newFile);
return result;
}
// 파일 메타데이터 생성 메서드
private async createFileMetadata(result: any, userId: number): Promise<File> {
const newFile = new File();
newFile.path = result.filePath;
newFile.filename = result.filename;
newFile.mimetype = result.mimetype;
newFile.size = result.size;
newFile.fileType = FileType.PROFILE;
newFile.user = await this.userService.findOneById(userId);
return newFile;
}
}
TypeScript
복사
•
프로필 사진의 이름이 같은 경우 새 파일이 생성되지 않는다.
◦
이는 실제로 회원들마다 개인의 사진이 사용될 것인데 중복되면 다른 사람의 프로필 사진이 사용되거나 삭제, 수정 등에서도 서로에게 영향을 줄 수 있다.
◦
따라서 객체의 유일성을 보장하기 위하여 각 파일 이름에 UUID로 난수를 포함하여 새로운 파일로 처리되도록 하고자 한다.
▪
우선 UUID를 사용하기 위하여 npm을 통해 패키지 의존성을 설치해준다.


npm i uuid
Shell
복사
▪
uuid를 사용하는 클래스 위에 아래처럼 임포트를 통해 해당 기능을 사용할 수 있다.
import { v4 as uuidv4 } from 'uuid';
TypeScript
복사
•
file.service.ts
◦
사진이 업로드 될 때 마다 유일성을 가질 수 있도록 uuid+filename 조합되도록 uniqueFilename 을 선언
▪
프로필 사진을 업로드하는 경우
•
업로드되어 multer로 변환된 파일을 fs.writeFile() 을 통해서 생성한다.
▪
기본 프로필 사진을 사용하는 경우
•
업로드된 사진이 없으므로 로컬 저장소에 있는 기본 프로필 사진 베이스를 fs.copyFile()복사하는 로직을 선택했다.
•
이 경우에도 특정 user의 기본 프로필 사진인 것으로 유일성이 보장되도록 uuid를 추가해주는 로직을 작성했다.
import { Injectable, HttpException, HttpStatus } from '@nestjs/common';
import { promises as fs } from 'fs';
import * as path from 'path';
import { File } from './entities/file.entity';
import { InjectRepository } from '@nestjs/typeorm';
import { Repository } from 'typeorm';
import { v4 as uuidv4 } from 'uuid';
@Injectable()
export class FileService {
private uploadPath = '/Users/inyongkim/Documents/Projects/localStorage/profile';
private defaultPath = '/Users/inyongkim/Documents/Projects/localStorage/default'
private defaultProfilePicturePath = path.join(this.defaultPath, 'default-profile.png'); // 기본 프로필 사진 경로
constructor(
@InjectRepository(File)
private readonly fileRepository: Repository<File>
) {
this.ensureUploadPathExists();
}
async ensureUploadPathExists() {
try {
await fs.mkdir(this.uploadPath, { recursive: true });
} catch (err) {
throw new HttpException('Failed to create upload directory', HttpStatus.INTERNAL_SERVER_ERROR);
}
}
// 파일 업로드
async uploadFile(file: Express.Multer.File) {
const uniqueFilename = `${uuidv4()}-${file.originalname}`;
const filePath = path.join(this.uploadPath, uniqueFilename);
try {
await fs.writeFile(filePath, file.buffer); // 파일 저장
return {
message: 'File uploaded successfully',
filePath: filePath,
filename: uniqueFilename,
mimetype: file.mimetype,
size: file.size,
};
} catch (err) {
throw new HttpException('Failed to upload file', HttpStatus.INTERNAL_SERVER_ERROR);
}
}
// 기본 프로필 파일 업로드
async uploadDefaultProfilePictureFile() {
const uniqueFilename = `${uuidv4()}-default-profile.png`;
const filePath = path.join(this.uploadPath, uniqueFilename);
try {
// 기본 프로필 사진을 새 파일로 복사
await fs.copyFile(this.defaultProfilePicturePath, filePath);
// 파일 메타데이터 가져오기
const stats = await fs.stat(filePath);
const defaultProfilePicture = {
filePath: filePath,
filename: uniqueFilename,
mimetype: 'image/png',
size: stats.size,
};
return defaultProfilePicture;
} catch (err) {
console.error('Error copying default profile picture:', err);
throw new HttpException('Failed to upload default profile picture', HttpStatus.INTERNAL_SERVER_ERROR);
}
}
// 파일 엔터티 데이터베이스에 저장
async save(file: File) {
try {
return await this.fileRepository.save(file);
} catch (err) {
throw new HttpException('Failed to save file', HttpStatus.INTERNAL_SERVER_ERROR);
}
}
...
}
TypeScript
복사
•
기능 테스트
◦
uuid가 포함된 파일 정보 insert 쿼리에도 정상적으로 작동
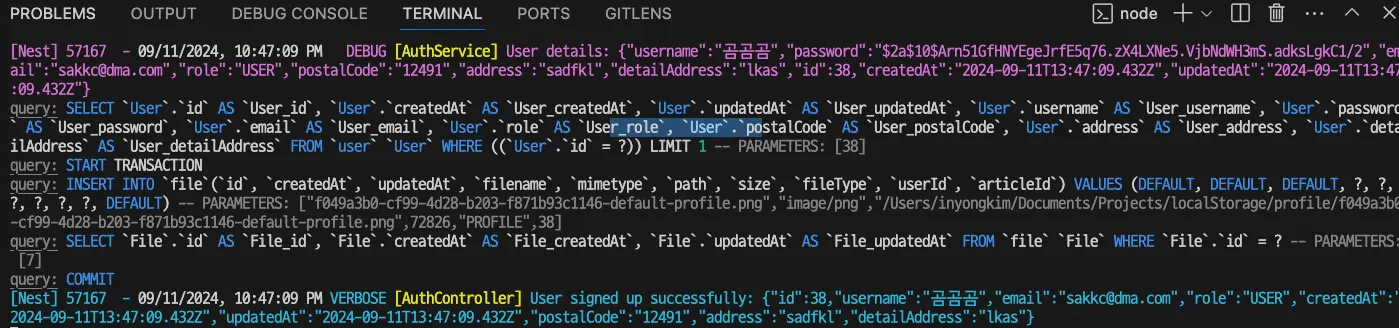
◦
실제 파일의 이름도 uuid가 포함된 파일이 생성
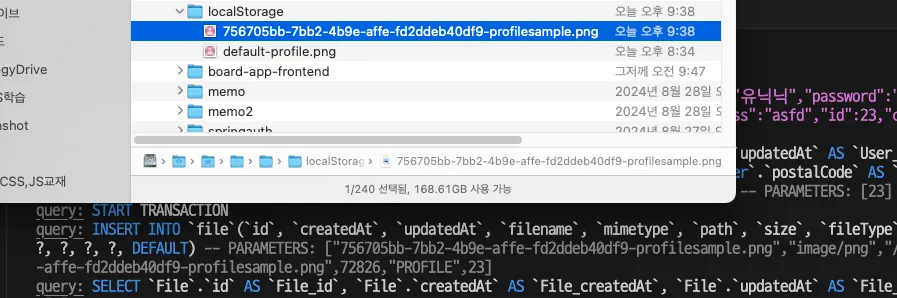
◦
데이터베이스의 file 테이블에도 uuid가 지정된 파일 이름이 정상적으로 등록되고 있다.
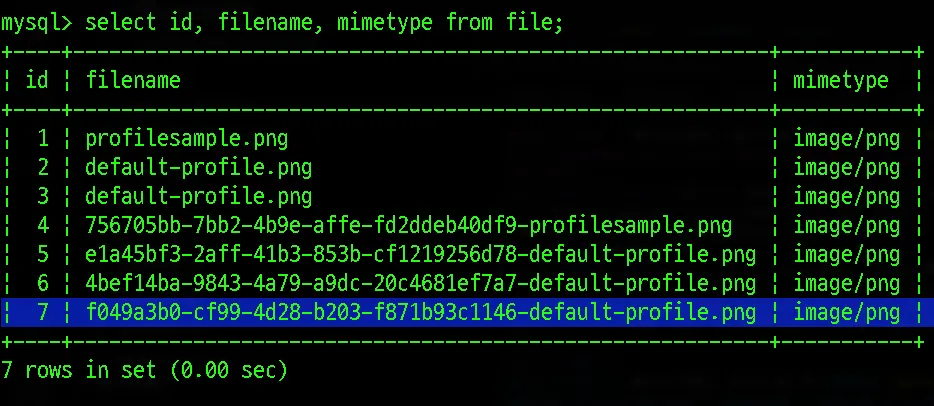
4.6.3 기본 프로필의 업로드 VS 정적 파일 제공 고민
기본 프로필 사진 파일도 업로드 되도록 처리한 이후 든 생각
•
기본 프로필 자체도 업로드되도록 한다 vs 기본 프로필이므로 프론트엔드에서 정적 파일로 대체시킨다.
•
이 상황에서 데이터베이스의 null을 피하는것에만 매몰되어 이 방식을 구현했지만, 지금 다시 드는 생각은
◦
기본 프로필 사진이 업로드되는 구성은 100만명 회원이 가입 된다면, 프로필 사진에 별로 신경을 쓰지 않는 사용자들이라면, 이는 곧 불필요한 파일 업로드가 100만번 발생 = 비용이 발생
◦
기본 프로필을 프론트엔드에서만 정적 파일로 대체하는 경우 = 데이터베이스에 null이 발생
◦
이 두가지가 고민의 요약인것 같다.
▪
하지만 실제 서비스들을 생각해보면, 나 또한 프로필 사진을 별로 신경쓰지 않는다. 이런 사용자들이 많을 것이라는 생각이 들었다.
▪
따라서 프론트엔드 정적 파일로 제공해주는 것으로 대체하고
▪
→ 프로필 사진 업로드를 유도하도록 하는것이 보다 올바른 선택이라는 생각이 들었다.
▪
→ 또한 프로필 사진이 파일이라는 엔터티로 묶여있어서 1:N인것도 고민해볼 문제긴 하다.
▪
→ 이것은 1:1로 처리해도 될 문제같긴 한데 엔터티가 추가되면서 구조가 복잡해질 가능성이 있고 여러 프로필 사진중에서 선택할 수도있어서 고민을 해봐야겠다.
4.7 레이아웃 구조 변경
레이아웃 참조 방식으로 리팩토링
•
기존 app.component.html에서 너무 많은 코드를 담고 있었다.
•
기존 코드
<ion-app>
<!-- Side Menu Navigation -->
<ion-menu side="end" contentId="main-content">
<ion-header>
<ion-toolbar>
<ion-title>Menu</ion-title>
</ion-toolbar>
</ion-header>
<ion-content>
<ion-list>
<ion-item routerLink="/auth">SignIn & SignUp</ion-item>
<ion-item routerLink="/article-list">Article List</ion-item>
</ion-list>
</ion-content>
</ion-menu>
<!-- Header -->
<ion-header>
<ion-toolbar>
<!-- Logo -->
<ion-buttons slot="start">
<ion-button class="profile-icon-button" routerLink="/">
<img src='/assets/logo.png' class="profile-icon" alt="Profile Icon" />
</ion-button>
</ion-buttons>
<!-- App Title -->
<ion-title class="ion-text-center">
Board App
</ion-title>
<!-- MyPage -->
<ion-buttons slot="end">
<ion-button class="profile-icon-button" routerLink="/my-page">
<img src='/assets/default-profile.png' class="profile-icon" alt="Profile Icon" />
</ion-button>
</ion-buttons>
<!-- Menu -->
<ion-buttons slot="end">
<ion-menu-button></ion-menu-button>
</ion-buttons>
</ion-toolbar>
</ion-header>
<!-- Main Contents -->
<ion-router-outlet id="main-content"></ion-router-outlet>
<!-- Footer -->
<ion-footer>
<ion-toolbar>
<ion-title id="footer-text-box" class="ion-text-center">
<p id="footer-text">ⓒ 2024. yzpocket.citeFred, All Rights Reserved.</p>
</ion-title>
</ion-toolbar>
</ion-footer>
</ion-app>
TypeScript
복사
•
표준 레이아웃에 따라 Header-Contents-Footer로 구조화 시키고자 변경했지만 해당 파일에 모든 부분이 들어가 있었으므로 각 부분을 컴포넌트화 시켜 별도 layouts 모듈로 분리하였다.
•
변경된 코드
<ion-app>
<!-- Header -->
<app-header></app-header>
<!-- Side Menu Navigation -->
<app-menu></app-menu>
<!-- Main Contents -->
<ion-router-outlet id="main-content"></ion-router-outlet>
<!-- Footer -->
<app-footer></app-footer>
</ion-app>
TypeScript
복사
•
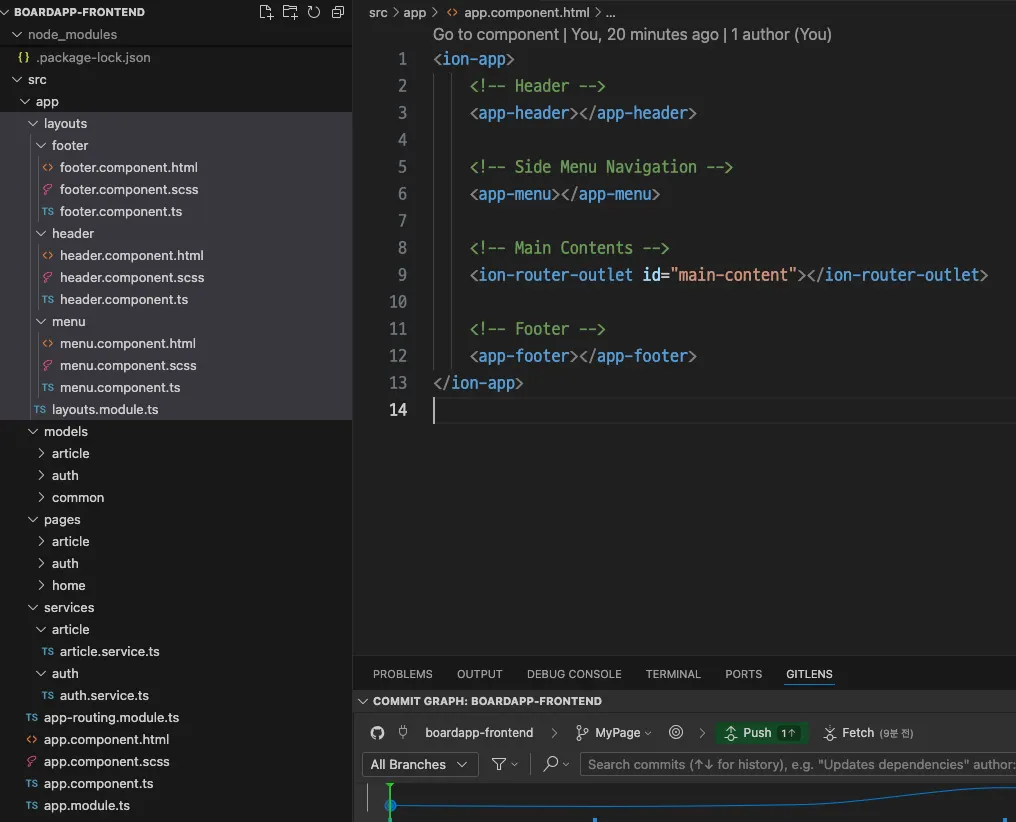
변경된 폴더 구조
◦
layouts 내로 각 파트마다 코드를 분산시켜서 별도로 관리할 수 있게 모듈화 시켰다.
◦
그 외 변경
▪
API 호출을 담당하는 서비스 계층은 컴포넌트 내에서 외부로 별도 관리하도록 이동했다.
▪
구조 변경에 따라 모듈간 의존성을 재정의해준다.
◦
리소스 폴더 구조는 다음과 같다
src/
├── app/
│ ├── layouts/ # 레이아웃 컴포넌트
│ │ ├── header/
│ │ ├── menu/
│ │ └── ... (기타 컴포넌트)
│ ├── pages/ # 애플리케이션 페이지(메인컨텐츠)
│ │ ├── auth/
│ │ ├── article-list/
│ │ └── ... (기타 페이지)
│ ├── services/ # 서비스 (API 호출, 비즈니스 로직)
│ ├── models/ # 데이터 모델
│ ├── pipes/ # 파이프 (데이터 변환)
│ ├── directives/ # 디렉티브
│ ├── guards/ # 라우터 가드
│ ├── app-routing.module.ts # 라우팅 설정
│ ├── app.module.ts # 루트 모듈
│ └── app.component.ts # 루트 컴포넌트
│ └── app.component.html # 루트 템플릿
├── assets/ # 정적 자산 (이미지, 스타일 등)
├── environments/ # 환경 설정 (개발, 프로덕션)
└── index.html # 진입점 HTML 파일
Plain Text
복사
4.8 My-Page 구성하기(Output)
4.8.1 Backend API 서버 구현
회원 정보를 응답하는 비지니스 로직 필요
•
User 관련 CRUD Operation이 필요하다.
•
조회 기능을 통해 User 정보를 기본적으로 가져와야 한다.
•
연관관계가 있는 File을 추가로 조회해야 한다.(현재 User,File은 Lazy Loading 상태이다.)
user.controller.ts
•
User의 정보를 조회 할 수 있는 Controller 계층이다.
•
클라이언트 요청으로부터 파라미터로 id(회원 고유 번호)를 받아서 findOneByIdWithFiles(id) 메서드로 id를 인수로 전달하며 호출
•
조회 결과를 UserWithFilesResponseDto 형식에 맞추어 DTO 객체를 생성하고 ApiResponseDto 양식에 맞추어 반환한다.
import { Controller, Get, Logger, Param, UseGuards } from '@nestjs/common';
import { UserService } from './user.service';
import { AuthGuard } from '@nestjs/passport';
import { RolesGuard } from 'src/auth/custom-role.guard';
import { UserResponseDto } from 'src/user/dto/user-response.dto';
import { ApiResponse } from 'src/common/api-response.dto';
import { UserWithFilesResponseDto } from './dto/user-with-files-response.dto';
@Controller('api/users')
@UseGuards(AuthGuard('jwt'), RolesGuard)
export class UserController {
private readonly logger = new Logger(UserController.name);
constructor(private userService: UserService){}
// 특정 번호의 회원 정보 조회
@Get(':id')
async getUserById(@Param('id') id: number): Promise<ApiResponse<UserWithFilesResponseDto>> {
this.logger.verbose(`Retrieving User with ID ${id}`);
const user = await this.userService.findOneByIdWithFiles(id);
const userDto = new UserWithFilesResponseDto(user);
this.logger.verbose(`User retrieved successfully: ${JSON.stringify(userDto)}`);
return new ApiResponse(true, 200, 'User retrieved successfully', userDto);
}
}
TypeScript
복사
user.service.ts
•
Controller로부터 findOneByIdWithFiles(id) 메서드가 호출된다.
◦
인수로 전달받은 id를 파라미터로 전달받아서 Repository 계층의 where 조건으로 사용된다.
◦
해당 부분은 쿼리 빌더를 통해서 user와 연관관계가 있는 file 테이블을 join하여 해당 회원이 업로드한 파일들을 추가적으로 조회하게 된다.
import { Injectable } from '@nestjs/common';
import { User } from './user.entity';
import { Repository } from 'typeorm';
import { InjectRepository } from '@nestjs/typeorm';
@Injectable()
export class UserService {
constructor(
@InjectRepository(User)
private readonly userRepository: Repository<User>,
) {}
async findOneById(id: number): Promise<User> {
return this.userRepository.findOneBy({id});
}
// 회원정보+파일 정보까지 가져오는 별도 메서드(QueryBuilder)
async findOneByIdWithFiles(id: number): Promise<User> {
return this.userRepository.createQueryBuilder('user')
.leftJoinAndSelect('user.files', 'file')
.where('user.id = :id', { id })
.getOne();
}
}
TypeScript
복사
•
POSTMAN을 통한 테스트
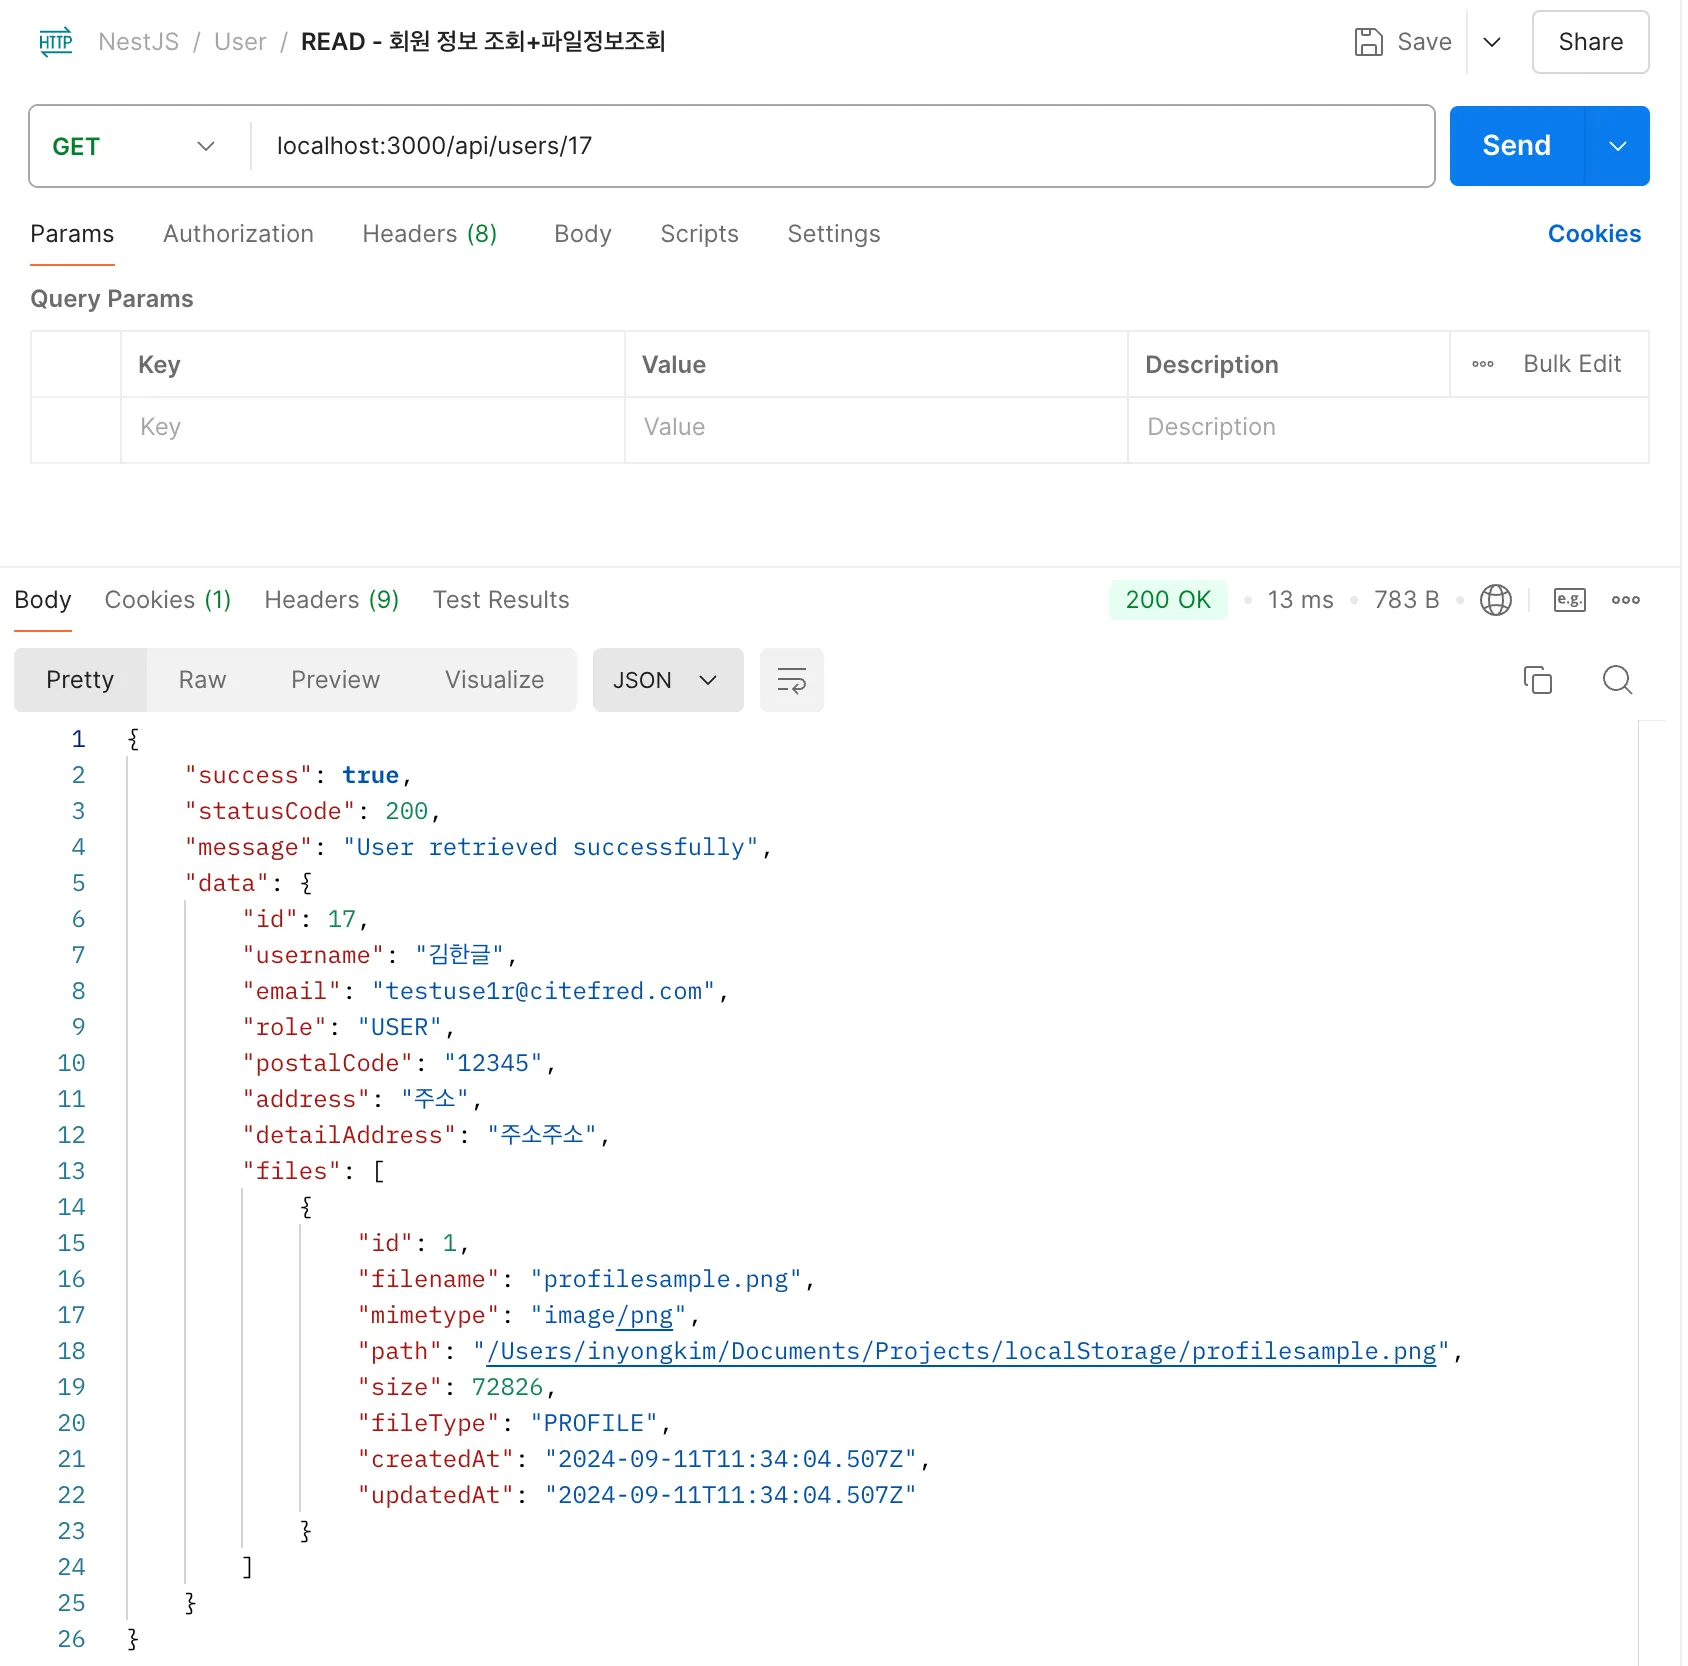
file-response.dto.ts
•
Service 계층에서 쿼리를 통해 데이터베이스에서 조회한 file의 내용은 필요한 정보만 FileResponseDto로 변환하여 반환한다.
import { FileType } from "../entities/file-type.enum";
import { File } from "../entities/file.entity";
export class FileResponseDto {
id: number;
filename: string;
mimetype: string;
path: string;
size: number;
fileType: FileType;
createdAt: Date;
updatedAt: Date;
constructor(file: File){
this.id = file.id;
this.filename = file.filename;
this.mimetype = file.mimetype;
this.path = file.path;
this.size = file.size;
this.fileType = file.fileType;
this.createdAt = file.createdAt;
this.updatedAt = file.updatedAt;
}
}
TypeScript
복사
user-with-files-response.dto.ts
•
회원 정보와 파일의 정보를 함께 조회하는 경우 사용되는 DTO이다.
•
필요한 필드를 추가, 삭제하여 조절 할 수 있다.
import { FileResponseDto } from "src/file/dto/file-response.dto";
import { UserRole } from "../user-role.enum";
import { User } from "../user.entity";
export class UserWithFilesResponseDto {
id: number;
username: string;
email: string;
role: UserRole;
postalCode: string;
address: string;
detailAddress: string;
files: FileResponseDto[];
constructor(user: User) {
this.id = user.id;
this.username = user.username;
this.email = user.email;
this.role = user.role;
this.postalCode = user.postalCode;
this.address = user.address;
this.detailAddress = user.detailAddress;
this.files = user.files.map(file => new FileResponseDto(file));
}
}
TypeScript
복사
4.8.2 Frontend 샘플 구현 및 버그 픽스
회원 정보 및 프로필 사진 나타나게 하기
•
MyPage를 통해서 회원 정보를 조회하는 부분을 구현하고자 한다.
•
이 부분에서 회원의 프로필 이미지도 나타나게 하면서 File Output도 구현된다.
•
또한 프로필 이미지 수정하기를 구현하여 이미지 미등록자들도 추가 할 수 있는 기능을 추가
◦
기본 프로필 이미지 자동 추가 부분을 프론트엔드에서 기본 정적 파일 제공으로 대체하기 위함
mypage 리소스 생성
•
ionic CLI 명령어를 통해 간편하게 기본 모듈셋을 생성한다.
ionic g
Shell
복사
◦
page를 선택하면 모든 파일들이 생성 됨
◦
pages/mypage 경로를 입력하면 루트(app/) 경로 이내로 자동생성
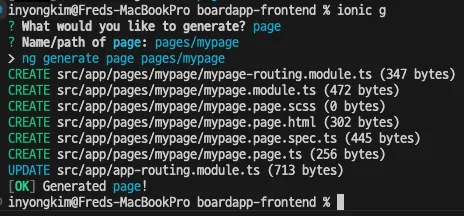
•
기본 리소스 구조가 생성된다.
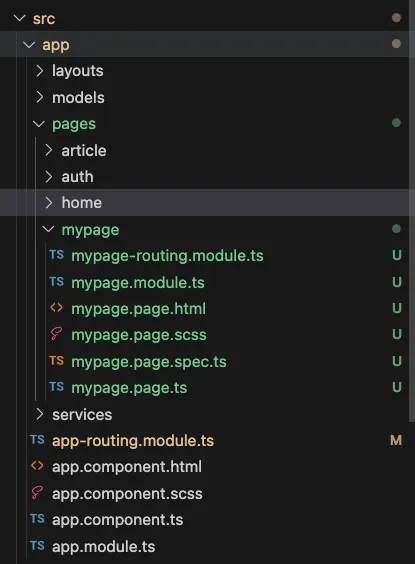
•
자동으로 app-routing.module.ts 에도 localhost:{port}/mypage 경로의 페이지 라우팅 코드가 입력된다.
import { NgModule } from '@angular/core';
import { RouterModule, Routes } from '@angular/router';
import { HomeComponent } from './pages/home/home.component';
const routes: Routes = [
{
path: '', component: HomeComponent
},
{
path: 'article-list',
loadChildren: () => import('./pages/article/article.module').then(m => m.ArticleModule)
},
{
path: 'auth',
loadChildren: () => import('./pages/auth/auth.module').then(m => m.AuthModule)
},
{
path: 'mypage',
loadChildren: () => import('./pages/mypage/mypage.module').then( m => m.MypagePageModule)
}
];
@NgModule({
imports: [RouterModule.forRoot(routes)],
exports: [RouterModule]
})
export class AppRoutingModule {}
Shell
복사
UserService 생성
•
ionic CLI 명령어를 통해 간편하게 기본 서비스 계층을 생성한다.
ionic g
Shell
복사
◦
service를 선택하면 모든 파일들이 생성 됨
◦
service/user/user 경로를 입력하면 루트(app/) 경로 이내로 자동생성
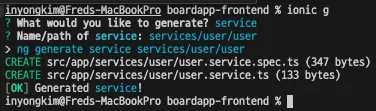
•
기본 서비스 구조가 생성된다.
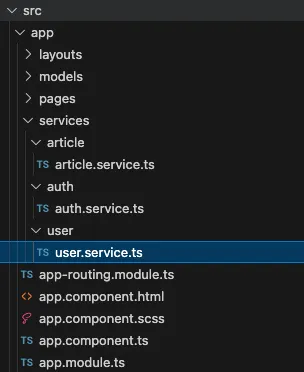
컨벤션 통일
•
컨벤션에 맞추어 파일명 변경
◦
mypage.page.html → mypage.component.html
◦
mypage.page.scss → mypage.component.scss
◦
mypage.page.ts → mypage.component.ts
◦
mypage.component.html
•
회원 정보 및 프로필 이미지를 받을 수 있도록 구성
<ion-header [translucent]="true">
<ion-toolbar>
<ion-title>My Page</ion-title>
</ion-toolbar>
</ion-header>
<ion-content [fullscreen]="true">
<ion-header collapse="condense">
<ion-toolbar>
<ion-title size="large">My Page</ion-title>
</ion-toolbar>
</ion-header>
<ion-list *ngIf="user">
<ion-item *ngIf="profileImage">
<ion-label>
<h2>Profile Picture</h2>
<ion-img [src]="profileImage" alt="Profile Image"></ion-img> <!-- 프로필 이미지를 표시 -->
</ion-label>
</ion-item>
<ion-item>
<ion-label>
<h2>Username</h2>
<p>{{ user.username }}</p>
</ion-label>
</ion-item>
<ion-item>
<ion-label>
<h2>Email</h2>
<p>{{ user.email }}</p>
</ion-label>
</ion-item>
<ion-item>
<ion-label>
<h2>Role</h2>
<p>{{ user.role }}</p>
</ion-label>
</ion-item>
<ion-item>
<ion-label>
<h2>Address</h2>
<p>{{ user.address }}, {{ user.detailAddress }}</p>
</ion-label>
</ion-item>
<ion-item>
<ion-label>
<h2>Postal Code</h2>
<p>{{ user.postalCode }}</p>
</ion-label>
</ion-item>
</ion-list>
</ion-content>
TypeScript
복사
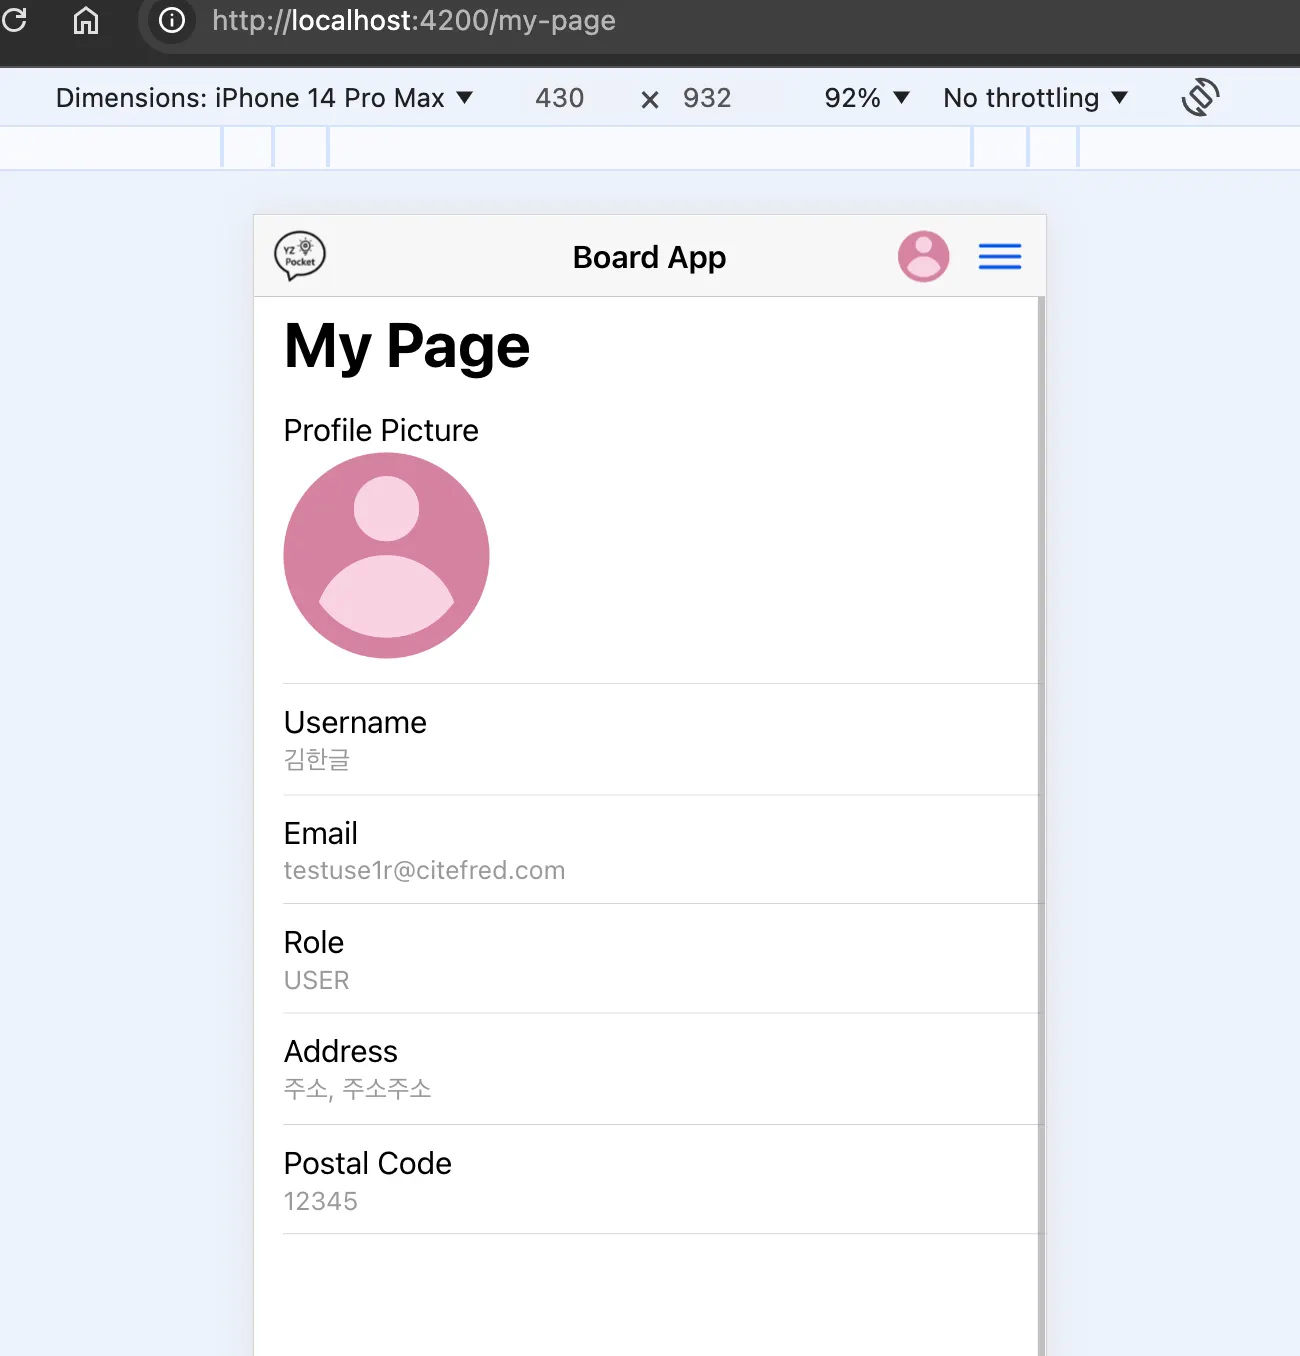
•
브라우저를 통한 테스트
•
임시 이미지 소스를 통해 화면확인
•
user.service.ts
•
•
header는 백엔드 API의 Guard를 고려하여 HttpHeaders(...)를 통해 쿠키를 전달하기 위해서 사용
import { HttpClient, HttpHeaders } from '@angular/common/http';
import { Injectable } from '@angular/core';
import { Observable } from 'rxjs';
import { ApiResponse } from 'src/app/models/common/api-response.interface';
import { UserWithFilesResponseData } from 'src/app/models/user/user-with-file-response-data.interface';
@Injectable({
providedIn: 'root'
})
export class UserService {
private apiUrl = 'http://localhost:3000/api/users';
constructor(private http: HttpClient) { }
getUserProfileById(id: number): Observable<ApiResponse<UserWithFilesResponseData>> {
const headers = new HttpHeaders({ 'Content-Type': 'application/json' });
return this.http.get<ApiResponse<UserWithFilesResponseData>>(`${this.apiUrl}/${id}`, { headers, withCredentials: true });
}
}
TypeScript
복사
라우팅 설정
•
app.routing.module.ts
◦
import { NgModule } from '@angular/core';
import { RouterModule, Routes } from '@angular/router';
import { HomeComponent } from './pages/home/home.component';
import { MypageComponent } from './pages/mypage/mypage.component';
const routes: Routes = [
{
path: '', component: HomeComponent
},
{
path: 'article-list',
loadChildren: () => import('./pages/article/article.module').then(m => m.ArticleModule)
},
{
path: 'auth',
loadChildren: () => import('./pages/auth/auth.module').then(m => m.AuthModule)
},
{
path: 'my-page', component: MypageComponent
}
];
@NgModule({
imports: [RouterModule.forRoot(routes)],
exports: [RouterModule]
})
export class AppRoutingModule {}
TypeScript
복사
•
mypage-routing.module.ts
◦
해당 부분은 추후 하위 경로가 필요할 경우 추가하게 된다.
import { NgModule } from '@angular/core';
import { Routes, RouterModule } from '@angular/router';
import { MypageComponent } from './mypage.component';
const routes: Routes = [
{
path: '', component: MypageComponent
}
];
@NgModule({
imports: [RouterModule.forChild(routes)],
exports: [RouterModule],
})
export class MypageRoutingModule {}
TypeScript
복사
의존성 관리 및 설정
•
mypage.module.ts
◦
mypage 리소스 폴더 내(로컬) 파일들간 의존성 주입을 위한 부분이다.
import { NgModule } from '@angular/core';
import { CommonModule } from '@angular/common';
import { FormsModule } from '@angular/forms';
import { IonicModule } from '@ionic/angular';
import { MypageRoutingModule } from './mypage-routing.module';
import { MypageComponent } from './mypage.component';
@NgModule({
imports: [
CommonModule,
FormsModule,
IonicModule,
MypageRoutingModule
],
declarations: [MypageComponent]
})
export class MypageModule {}
TypeScript
복사
•
app.module.ts
◦
다른 클래스에서 Mypage관련 컴포넌트들을 사용 할 수 있도록 MypageModule을 추가해준다.
import { NgModule } from '@angular/core';
import { BrowserModule } from '@angular/platform-browser';
import { RouteReuseStrategy, RouterModule } from '@angular/router';
import { IonicModule, IonicRouteStrategy } from '@ionic/angular';
import { AppComponent } from './app.component';
import { AppRoutingModule } from './app-routing.module';
import { HttpClientModule } from '@angular/common/http';
import { HomeModule } from './pages/home/home.module';
import { LayoutsModule } from './layouts/layouts.module';
import { MypageModule } from './pages/mypage/mypage.module';
@NgModule({
declarations: [AppComponent],
imports: [
RouterModule,
BrowserModule,
IonicModule.forRoot(),
AppRoutingModule,
HttpClientModule,
HomeModule,
MypageModule,
LayoutsModule,
],
providers: [{ provide: RouteReuseStrategy, useClass: IonicRouteStrategy }],
bootstrap: [AppComponent],
})
export class AppModule {}
TypeScript
복사
인터페이스 선언
•
user-with-files-response-data.interface.ts
◦
user 정보와 file 정보를 함께 다루는 인터페이스
import { FileResponseData } from "../file/file-response-data.interface";
import { UserRole } from "./user-role.enum";
export interface UserWithFilesResponseData {
id: number;
username: string;
email: string;
role: UserRole;
postalCode: string;
address: string;
detailAddress: string;
files: FileResponseData[];
}
TypeScript
복사
•
file-response-data.interface.ts
◦
file 요청과 응답에서 파일의 정보들을 정의한 인터페이스
import { FileType } from "./file-type.enum";
export interface FileResponseData {
id: number;
filename: string;
mimetype: string;
path: string;
size: number;
fileType: FileType;
createdAt: Date;
updatedAt: Date;
}
TypeScript
복사
•
file-type.enum.ts
◦
파일 타입 열거형 클래스
export enum FileType {
PROFILE = 'PROFILE',
DOCUMENT = 'DOCUMENT',
IMAGE = 'IMAGE',
VIDEO = 'VIDEO'
}
TypeScript
복사
4.8.3 로그인된 유저 정보를 사용
현재는 하드코딩된 회원 번호로 회원 정보+파일 정보가 출력되고 있다.
•
백엔드 API 서버에서는 id 파라미터를 동적으로 받아서 처리 할 수 있도록 준비되어 있다.
•
하지만 프론트엔드의 API 요청에서는
◦
mypage.component.ts 에서 userid=17로 하드코딩된 회원 번호로 정보를 조회되고 있다.
◦
이것을 로그인된 유저의 회원 id를 추출하여 API 요청에 사용하도록 수정해야 한다.
jwt-decode 설치


•
암호화된 JWT 토큰으로부터 payload의 유저 정보에서 user.id 를 추출해야 한다.
•
토큰을 디코드 할 수 있는 라이브러리인 jwt-decode 를 설치한다.
npm i jwt-decode
Shell
복사

auth.service.ts
•
로그인 시 생성되어 클라이언트에 저장되는 쿠키로부터 JWT 토큰을 획득하고, 여기서 회원의 id를 추출하는 메서드들을 정의해야 한다.
•
쿠키의 이름은 백엔드 API 서버에서 ‘Authorization’으로 설정했기 때문에, 클라이언트에서도 해당 이름의 쿠키를 document.cookie를 통해 조회한다.
•
JwtDecode 라이브러리를 통해 JWT 토큰을 디코딩하여 payload에 담긴 claim에서 userId를 찾아낸다.
mypage.component.ts
•
이제 userId 변수는 auth.service에서 선언된 메서드를 호출하여 실제 로그인된 유저의 id를 받게 된다.
◦
id값이 없는 null 인경우에 대한 예외를 추가해주었다.
import { Component, OnInit } from '@angular/core';
import { UserService } from 'src/app/services/user/user.service';
import { ApiResponse } from 'src/app/models/common/api-response.interface'; // ApiResponse 인터페이스 임포트
import { UserWithFilesResponseData } from 'src/app/models/user/user-with-file-response-data.interface';
import { AuthService } from 'src/app/services/auth/auth.service';
@Component({
selector: 'app-mypage',
templateUrl: './mypage.component.html',
styleUrls: ['./mypage.component.scss'],
})
export class MypageComponent implements OnInit {
user: UserWithFilesResponseData | undefined;
profileImage: string | undefined;
constructor(private userService: UserService, private authService: AuthService) {}
ngOnInit() {
const userId = this.authService.getUserIdFromToken();
if (userId !== null) {
this.userService.getUserProfileById(userId).subscribe({
next: response => {
if (response.success) {
this.user = response.data;
this.setProfileImage();
} else {
console.error(response.message);
}
},
error: err => {
console.error('Error fetching user:', err);
},
complete: () => {
console.log('Fetching user request completed.');
}
});
} else {
console.error('User ID is null. User is not logged in.');
}
}
setProfileImage() {
if (this.user && this.user.files) {
const profileFile = this.user.files.find(file => file.fileType === 'PROFILE');
this.profileImage = profileFile ? profileFile.path : undefined;
}
}
}
TypeScript
복사
[트러블슈팅] JWT-Cookie의 문제해결
•
위 과정에서 완성된 코드에서도 JWT 토큰을 읽지 못하는 상황이 지속 되었었다.
◦
쿠키에 JWT 토큰이 있는데도 get.cookie가 되지 않던 상황
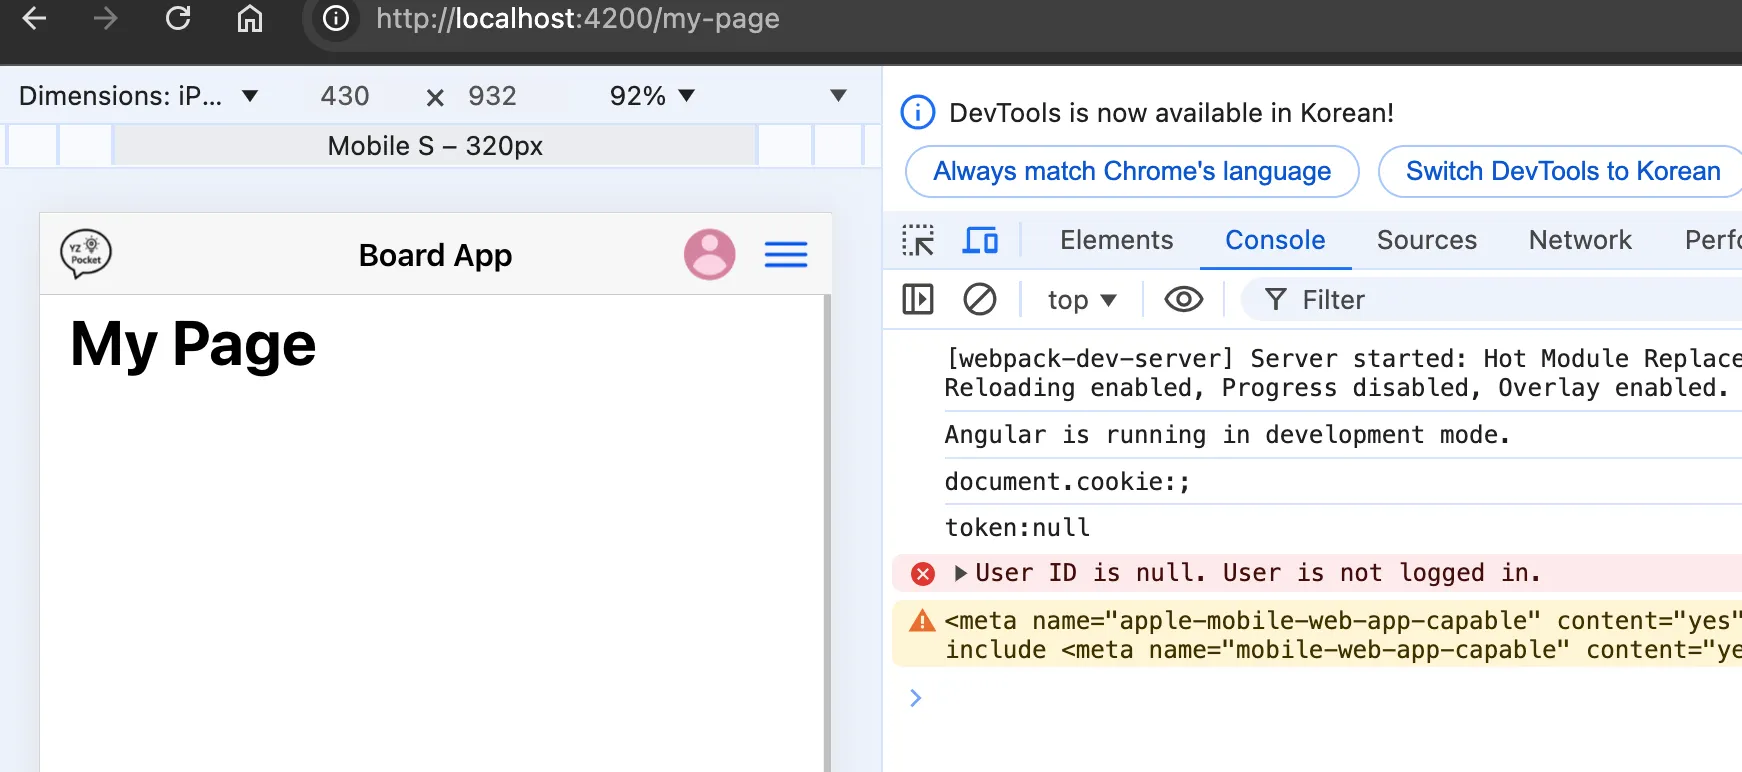
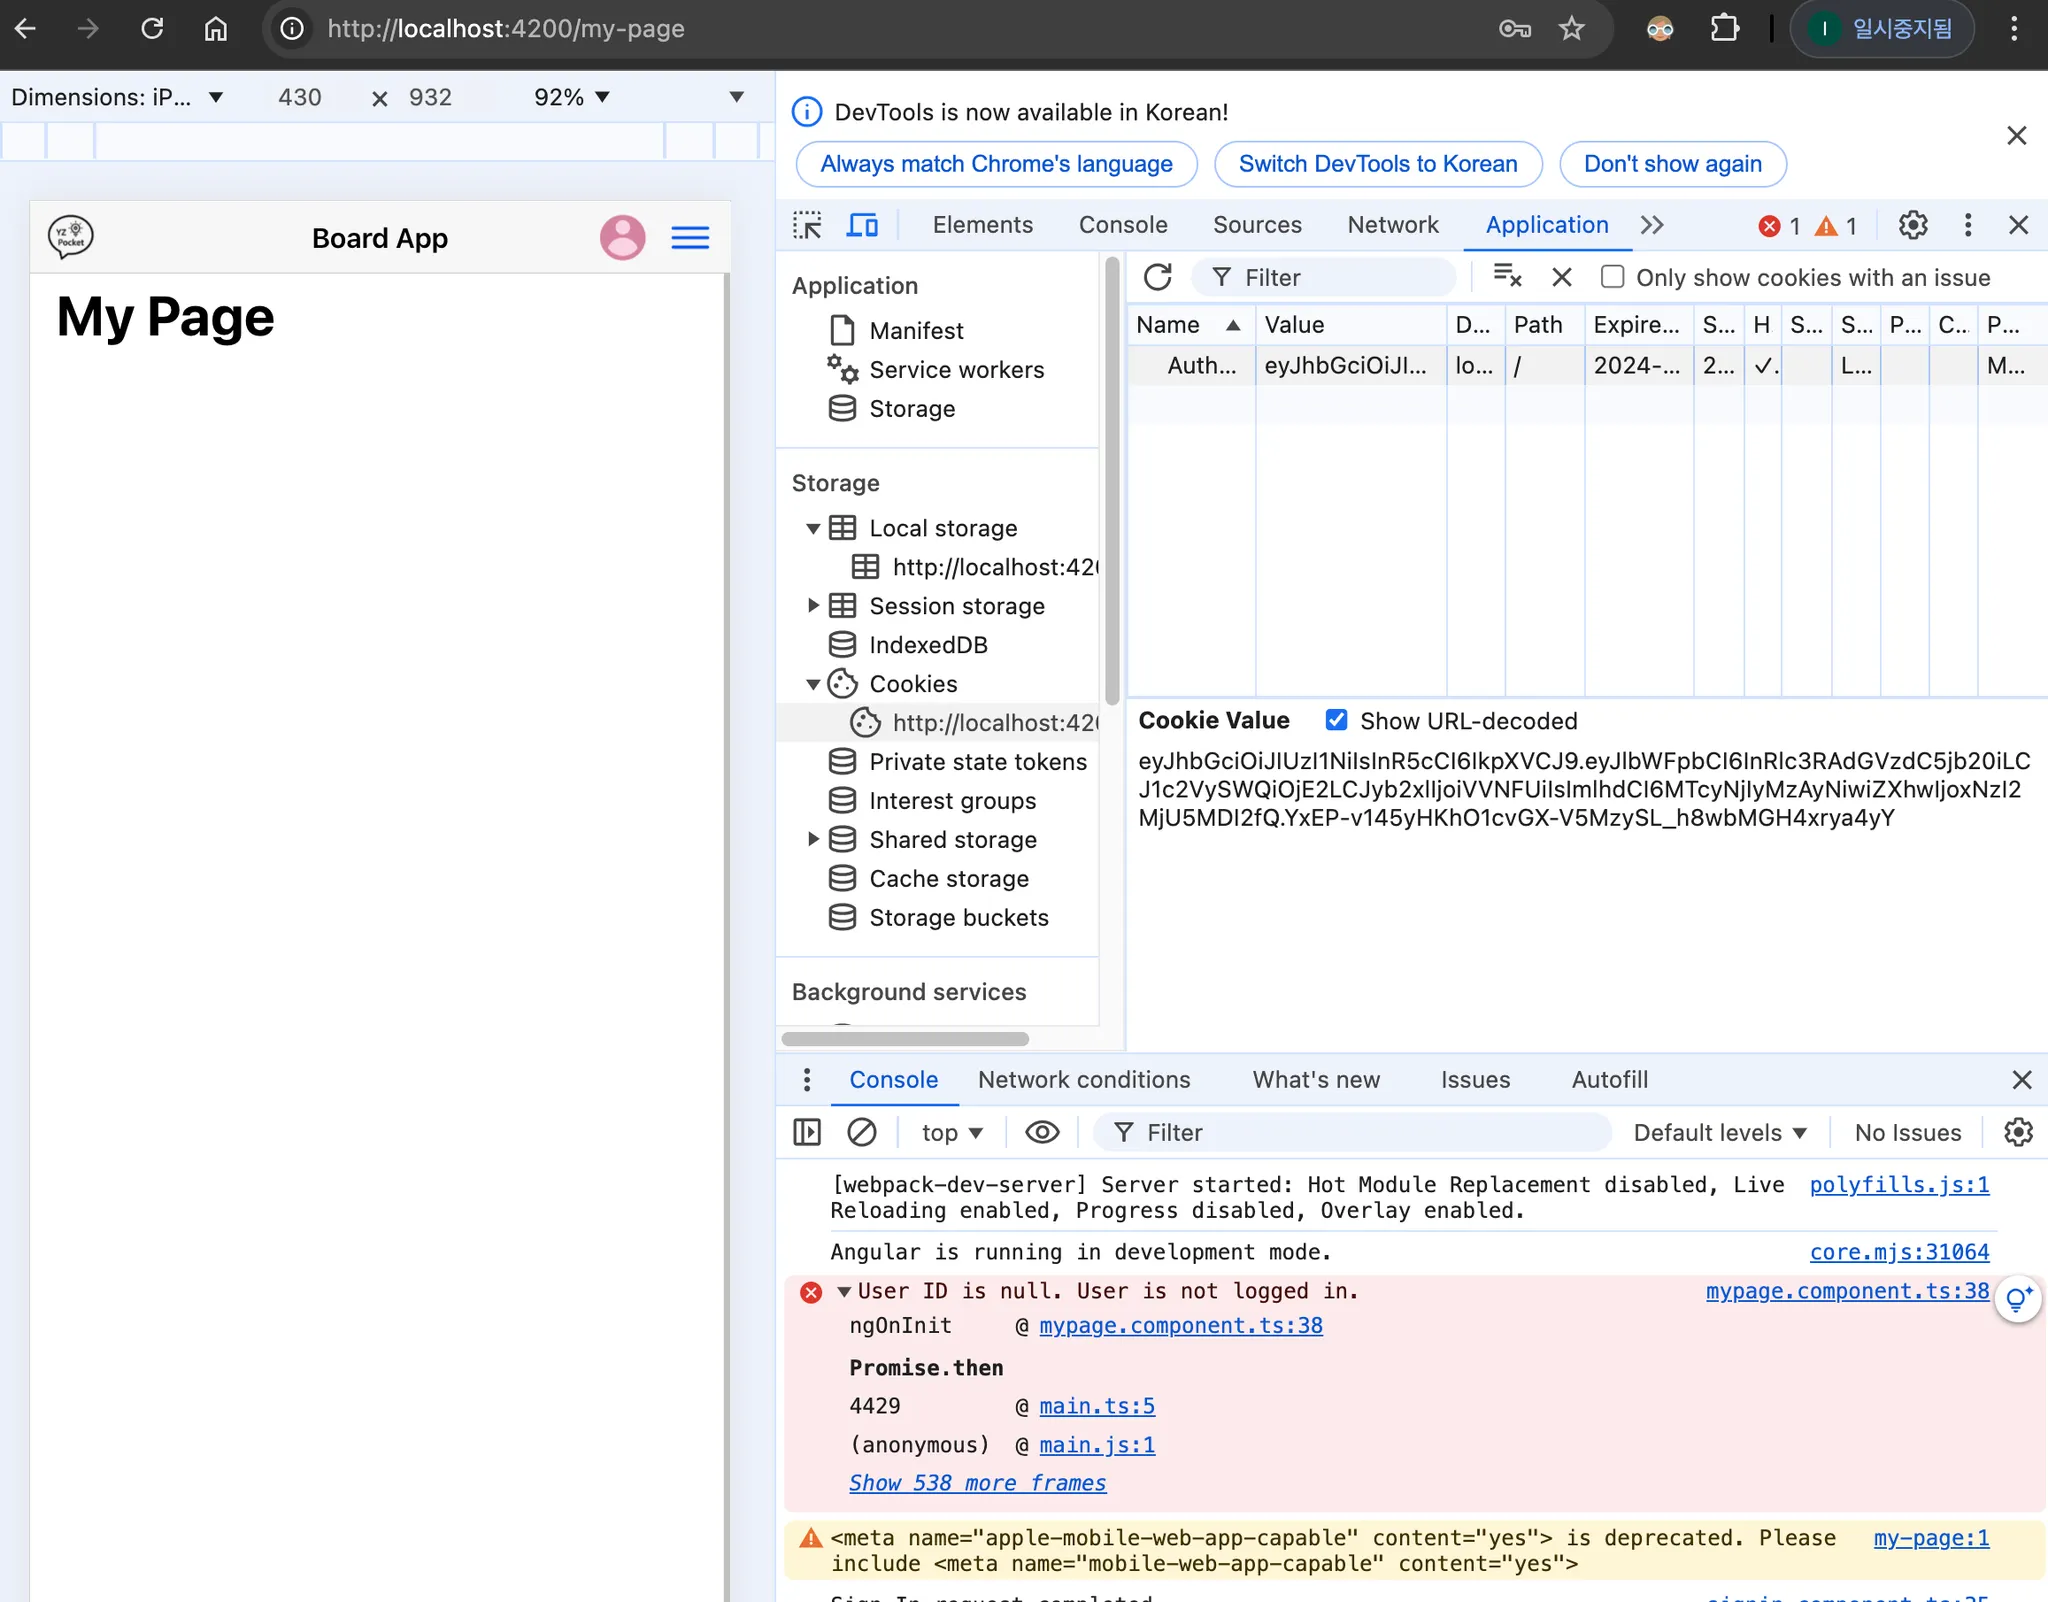

현재 JWT토큰을 쿠키에 저장하는 방식을 사용하는데 문제점이 발생했다.
•
우선 쿠키를 통해서 로그인된 회원의 id를 가져오려는 시도를 하고 있지만 get.Cookie()를 통해서 쿠키의 내용을 받을 수 없는 문제점이 계속되고 있다.
•
이는 프론트엔드 자바스크립트로는 쿠키를 읽을 수 없는 보안 설정때문인데 따라서 회원의 id를 알기 위한 백엔드로 요청을 해야 하는 비효율적인 상황이 나타나고 있다.
◦
로그인을 했음에도 불구하고 id 하나를 조회하는것만을 위한 요청, 쿼리 등이 필요한 상황
•
httpOnly 설정이 활성화된 쿠키는 클라이언트 측 JavaScript에서 접근할 수 없다.
◦
따라서 document.cookie나 비슷한 방법으로 쿠키를 조회할 수 없음
상황 조치 시도
•
우선 CORS 오리진이 다른 접근 설정은 이미 허용되어 있다.
•
또한 쿠키 포함 요청 허용도 이미 설정되어 있다.
◦
main.ts
import { NestFactory } from '@nestjs/core';
import { AppModule } from './app.module';
import * as cookieParser from 'cookie-parser'
import { Logger } from '@nestjs/common';
import * as dotenv from 'dotenv';
dotenv.config();
async function bootstrap() {
const app = await NestFactory.create(AppModule);
// cookie parser 미들웨어 추가
app.use(cookieParser());
app.enableCors({
origin: ['http://localhost:8100', 'http://localhost:4200'],
credentials: true, // 필요한 경우 쿠키를 포함한 요청 허용
});
await app.listen(process.env.SERVER_PORT);
Logger.log(`Application Running on Port : ${process.env.SERVER_PORT}`)
}
bootstrap();
TypeScript
복사
•
쿠키 설정 옵션에서 HttpOnly 속성을 false로 변경해보기
•
sameSite는 이미 lax로 설정되어 있다.
◦
auth.controller.ts
// 로그인 기능
@Post('/signin')
async signIn(@Body() signInRequestDto: SignInRequestDto, @Res() res: Response): Promise<void> {
this.logger.verbose(`Attempting to sign in user with email: ${signInRequestDto.email}`);
const { jwtToken, user } = await this.authService.signIn(signInRequestDto);
const userResponseDto = new UserResponseDto(user);
this.logger.verbose(`User signed in successfully: ${JSON.stringify(userResponseDto)}`);
// [3] 쿠키 설정
res.cookie('Authorization', jwtToken, {
httpOnly: false, // 클라이언트 측 스크립트에서 쿠키 접근 금지
secure: false, // HTTPS에서만 쿠키 전송, 임시 비활성화
maxAge: 3600000, // 1시간
sameSite: 'lax', // CSRF 공격 방어 및 크로스 사이트 요청에서 쿠키 포함
});
res.status(200).json(new ApiResponse(true, 200, 'Sign in successful', { jwtToken, user: userResponseDto }));
}
TypeScript
복사
◦
httpOnly 옵션을 false로 변경하여 id를 Cookie에 담긴 JWT를 디코딩하여 얻어내는 것을 확인하게 되었다.
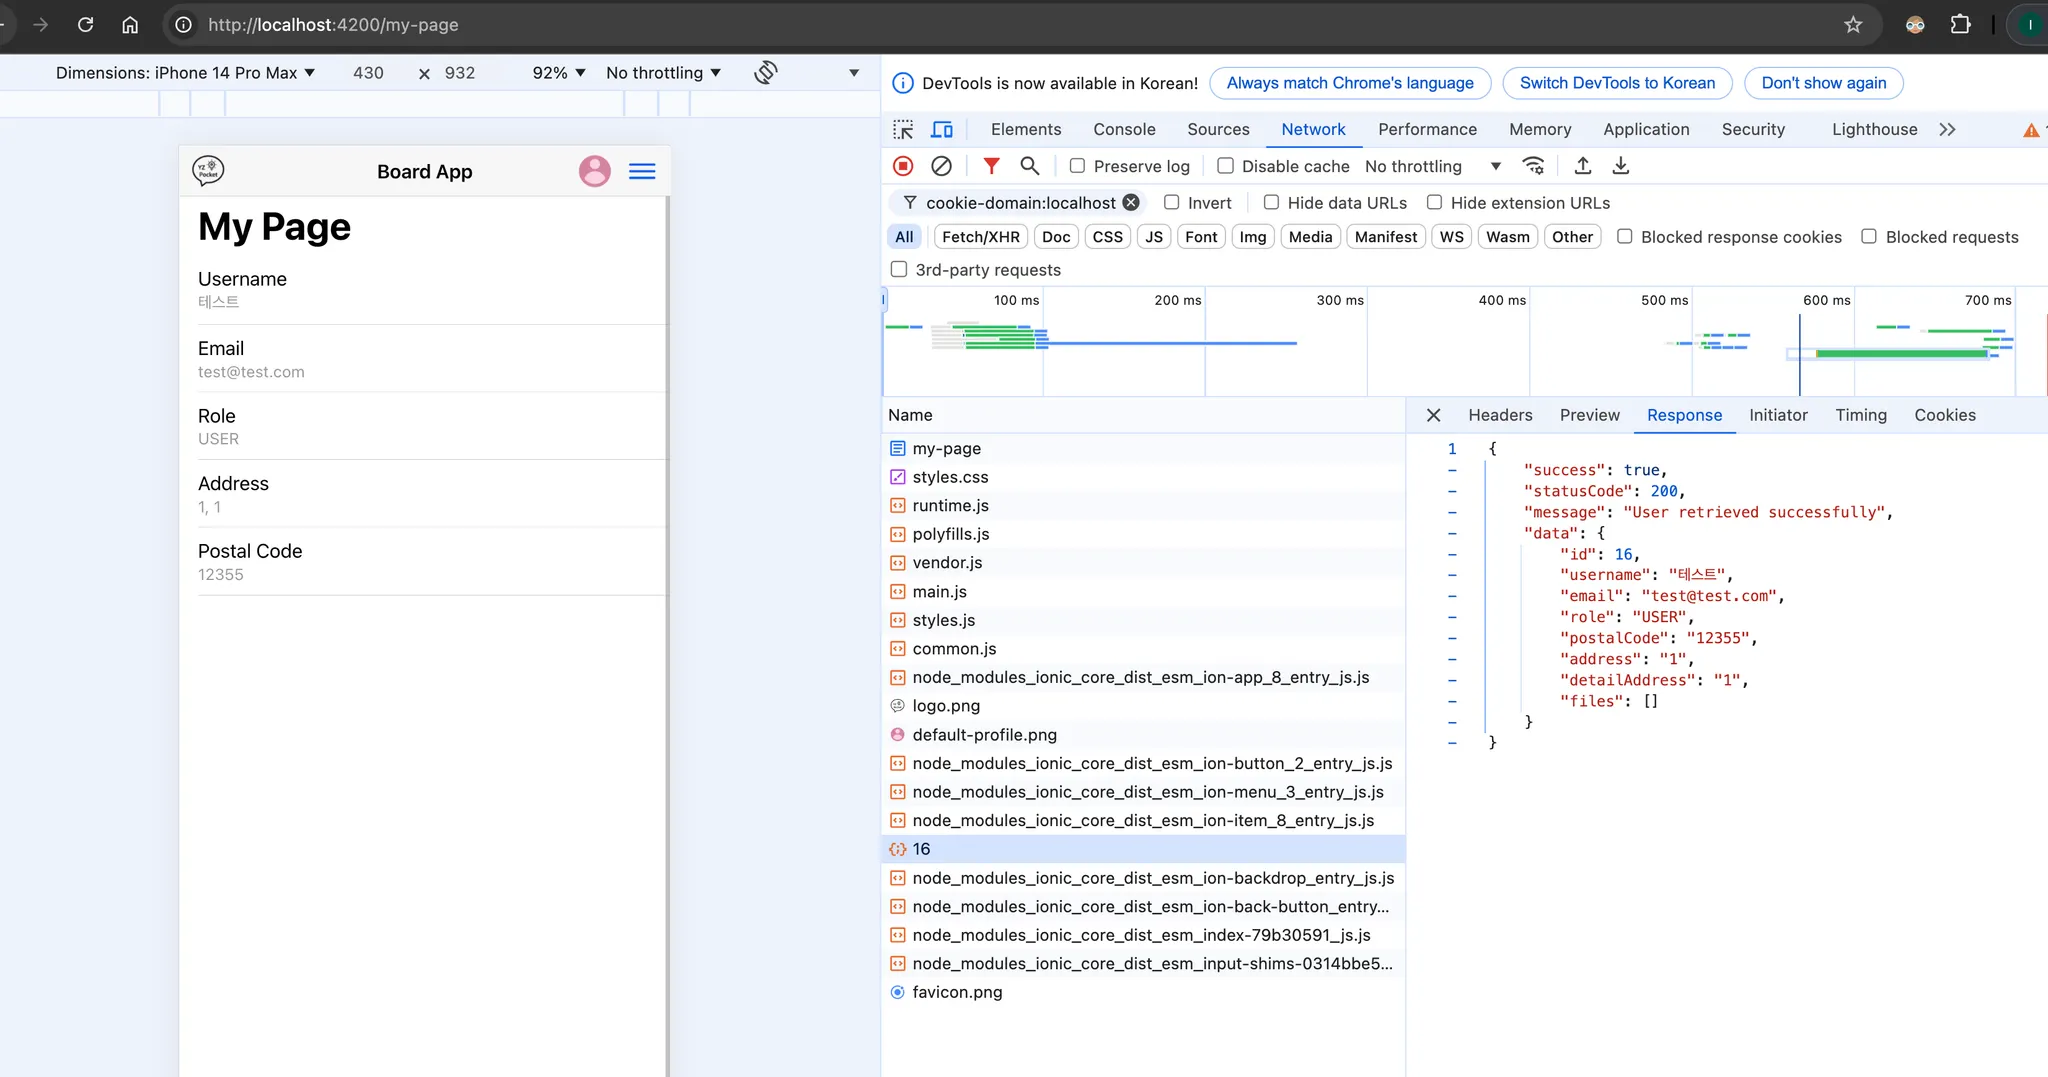
JWT-Header 방식이 기본값으로 선택되는 이유
•
접근성
◦
JWT는 클라이언트 측에서 쉽게 접근할 수 있어, 필요한 경우 언제든지 사용할 수 있다.
◦
예를 들어, Authorization 헤더에 JWT를 추가하여 API 요청을 간편하게 처리
•
보안
◦
httpOnly 쿠키와는 달리, 헤더 방식은 CSRF 공격에 대한 방어를 강화할 수 있음
◦
서버는 요청의 출처를 확인하고, 추가적인 보안 조치를 취할 수 있음
•
유연성
◦
모든 HTTP 요청(GET, POST, PUT, DELETE 등)에서 JWT를 사용할 수 있으며, 다양한 API에서 일관되게 사용할 수 있음
•
CORS와의 호환성
◦
CORS 설정이 간편하여, 다른 도메인 간의 요청에서도 JWT를 안전하게 사용 가능
4.8.4 정적 파일로 파일 서빙하기(Output / Serve-Static) 
이제 로그인 된 회원의 정보와 함께 파일 정보를 가져 올 수 있다.
•
하지만, 업로드되는 파일은 로컬 시스템 저장소에 저장되어 있으며, 특별한 파일 서버를 운영하고 있지 않기 때문에 서버가 해당 경로를 직접 접근 할 수 는 없다.
•
이에 따라 백엔드 API 서버는 해당 파일들을 서버가 접근 가능한 내부 경로에 저장하고, 이를 정적 서빙이 가능한 파일 경로를 제공해주는 방식으로 해결하고자 한다.
4.8.4.1 Backend
정적 파일 폴더 생성
•
일반적으로 백엔드 서버에서 정적 파일을 서브하는 경우 public이란 폴더를 사용한다.
•
그 내부에 uploads/profile/ 경로를 추가하여 프로필 사진들을 저장하고자 한다.
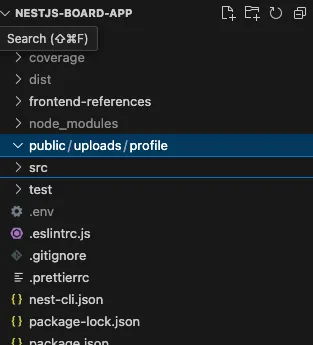
serve-static 라이브러리 설치


•
NestJS에서 정적 파일을 제공하려면 serve-static 라이브러리를 활용해야 한다.
•
이를 통해 express에서 정적 파일을 제공하게 된다.
npm i serve-static
Shell
복사
main.ts
•
우선 부트스트랩 애플리케이션을 <NestExpressApplication> 타입 제너릭으로 실행되도록 변경
•
app.useStaticAssets를 통해 정적 파일 경로를 작성
◦
클라이언트에서는 localohost:3000/uploads/… 처럼 접근 할 수 있다.
import { NestFactory } from '@nestjs/core';
import { AppModule } from './app.module';
import * as cookieParser from 'cookie-parser'
import { Logger } from '@nestjs/common';
import * as dotenv from 'dotenv';
import { NestExpressApplication } from '@nestjs/platform-express';
import * as path from 'path';
dotenv.config();
async function bootstrap() {
const app = await NestFactory.create<NestExpressApplication>(AppModule);
// cookie parser 미들웨어 추가
app.use(cookieParser());
app.enableCors({
origin: ['http://localhost:8100', 'http://localhost:4200'],
credentials: true, // 필요한 경우 쿠키를 포함한 요청 허용
});
app.useStaticAssets(path.join(__dirname, '..', 'public', 'uploads'), {
prefix: '/uploads/', // 클라이언트에서 접근할 URL 경로
});
await app.listen(process.env.SERVER_PORT);
Logger.log(`Application Running on Port : ${process.env.SERVER_PORT}`)
}
bootstrap();
TypeScript
복사
File 엔터티 수정
•
file.entity.ts
◦
프론트엔드에서 즉시 접근 가능한 url 컬럼 추가
import { Article } from "src/article/article.entity";
import { BaseEntity } from "src/common/base.entity";
import { User } from "src/user/user.entity";
import { Column, Entity, ManyToOne } from "typeorm";
import { FileType } from "./file-type.enum";
@Entity()
export class File extends BaseEntity {
@Column()
filename: string;
@Column()
mimetype: string;
@Column()
path: string;
@Column()
size: number;
@Column()
fileType: FileType;
@Column()
url: string;
@ManyToOne(() => User, user => user.files, { eager: false })
user: User;
@ManyToOne(() => Article, article => article.files, { eager: false })
article: Article;
}
TypeScript
복사
•
file-response.dto.ts
◦
엔터티 변경에 따라 응답에 파일의 url 추가를 위한 DTO 수정
import { FileType } from "../entities/file-type.enum";
import { File } from "../entities/file.entity";
export class FileResponseDto {
id: number;
filename: string;
mimetype: string;
path: string;
size: number;
fileType: FileType;
url: string;
createdAt: Date;
updatedAt: Date;
constructor(file: File){
this.id = file.id;
this.filename = file.filename;
this.mimetype = file.mimetype;
this.path = file.path;
this.size = file.size;
this.fileType = file.fileType;
this.url = file.url;
this.createdAt = file.createdAt;
this.updatedAt = file.updatedAt;
}
}
TypeScript
복사
•
profile-file.service.ts
◦
데이터베이스에 url 값을 할당하기 위한 메타데이터 생성 필드값 추가
import { Injectable } from '@nestjs/common';
import { FileService } from './file.service';
import { UserService } from 'src/user/user.service';
import { FileType } from './entities/file-type.enum';
import { File } from './entities/file.entity';
@Injectable()
export class ProfileService {
constructor(
private readonly fileService: FileService,
private readonly userService: UserService,
) {}
// 회원 가입 프로필 사진 업로드
async uploadProfilePicture(file: Express.Multer.File, id: number) {
// 파일 업로드
const result = await this.fileService.uploadFile(file);
// 파일 메타데이터 저장
const newFile = await this.createFileMetadata(result, id);
// 파일 엔터티를 데이터베이스에 저장
await this.fileService.save(newFile);
return result;
}
// 파일 메타데이터 생성 메서드
private async createFileMetadata(result: any, userId: number): Promise<File> {
const newFile = new File();
newFile.path = result.filePath;
newFile.filename = result.filename;
newFile.mimetype = result.mimetype;
newFile.size = result.size;
newFile.fileType = FileType.PROFILE;
newFile.url = result.url;
newFile.user = await this.userService.findOneById(userId);
return newFile;
}
}
TypeScript
복사
file.service.ts
•
파일 업로드 경로 수정
•
파일 url 생성 후 파일 엔터티 객체 result 에 추가
import { Injectable, HttpException, HttpStatus } from '@nestjs/common';
import { promises as fs } from 'fs';
import * as path from 'path';
import { File } from './entities/file.entity';
import { InjectRepository } from '@nestjs/typeorm';
import { Repository } from 'typeorm';
import { v4 as uuidv4 } from 'uuid';
@Injectable()
export class FileService {
private uploadPath = path.join(__dirname, '..', '..', 'public', 'uploads', 'profile');
constructor(
@InjectRepository(File)
private readonly fileRepository: Repository<File>
) {
this.ensureUploadPathExists();
}
async ensureUploadPathExists() {
try {
await fs.mkdir(this.uploadPath, { recursive: true });
} catch (err) {
throw new HttpException('Failed to create upload directory', HttpStatus.INTERNAL_SERVER_ERROR);
}
}
// 파일 업로드
async uploadFile(file: Express.Multer.File) {
const uniqueFilename = `${uuidv4()}-${file.originalname}`;
const filePath = path.join(this.uploadPath, uniqueFilename);
const fileUrl = `http://localhost:${process.env.SERVER_PORT}/uploads/profile/${uniqueFilename}`;
try {
await fs.writeFile(filePath, file.buffer); // 파일 저장
return {
message: 'File uploaded successfully',
filePath: filePath,
filename: uniqueFilename,
mimetype: file.mimetype,
size: file.size,
url: fileUrl,
};
} catch (err) {
throw new HttpException('Failed to upload file', HttpStatus.INTERNAL_SERVER_ERROR);
}
}
// 파일 엔터티 데이터베이스에 저장
async save(file: File) {
try {
return await this.fileRepository.save(file);
} catch (err) {
throw new HttpException('Failed to save file', HttpStatus.INTERNAL_SERVER_ERROR);
}
}
}
TypeScript
복사
•
브라우저와 서버를 통한 테스트
◦
회원가입 필드 입력
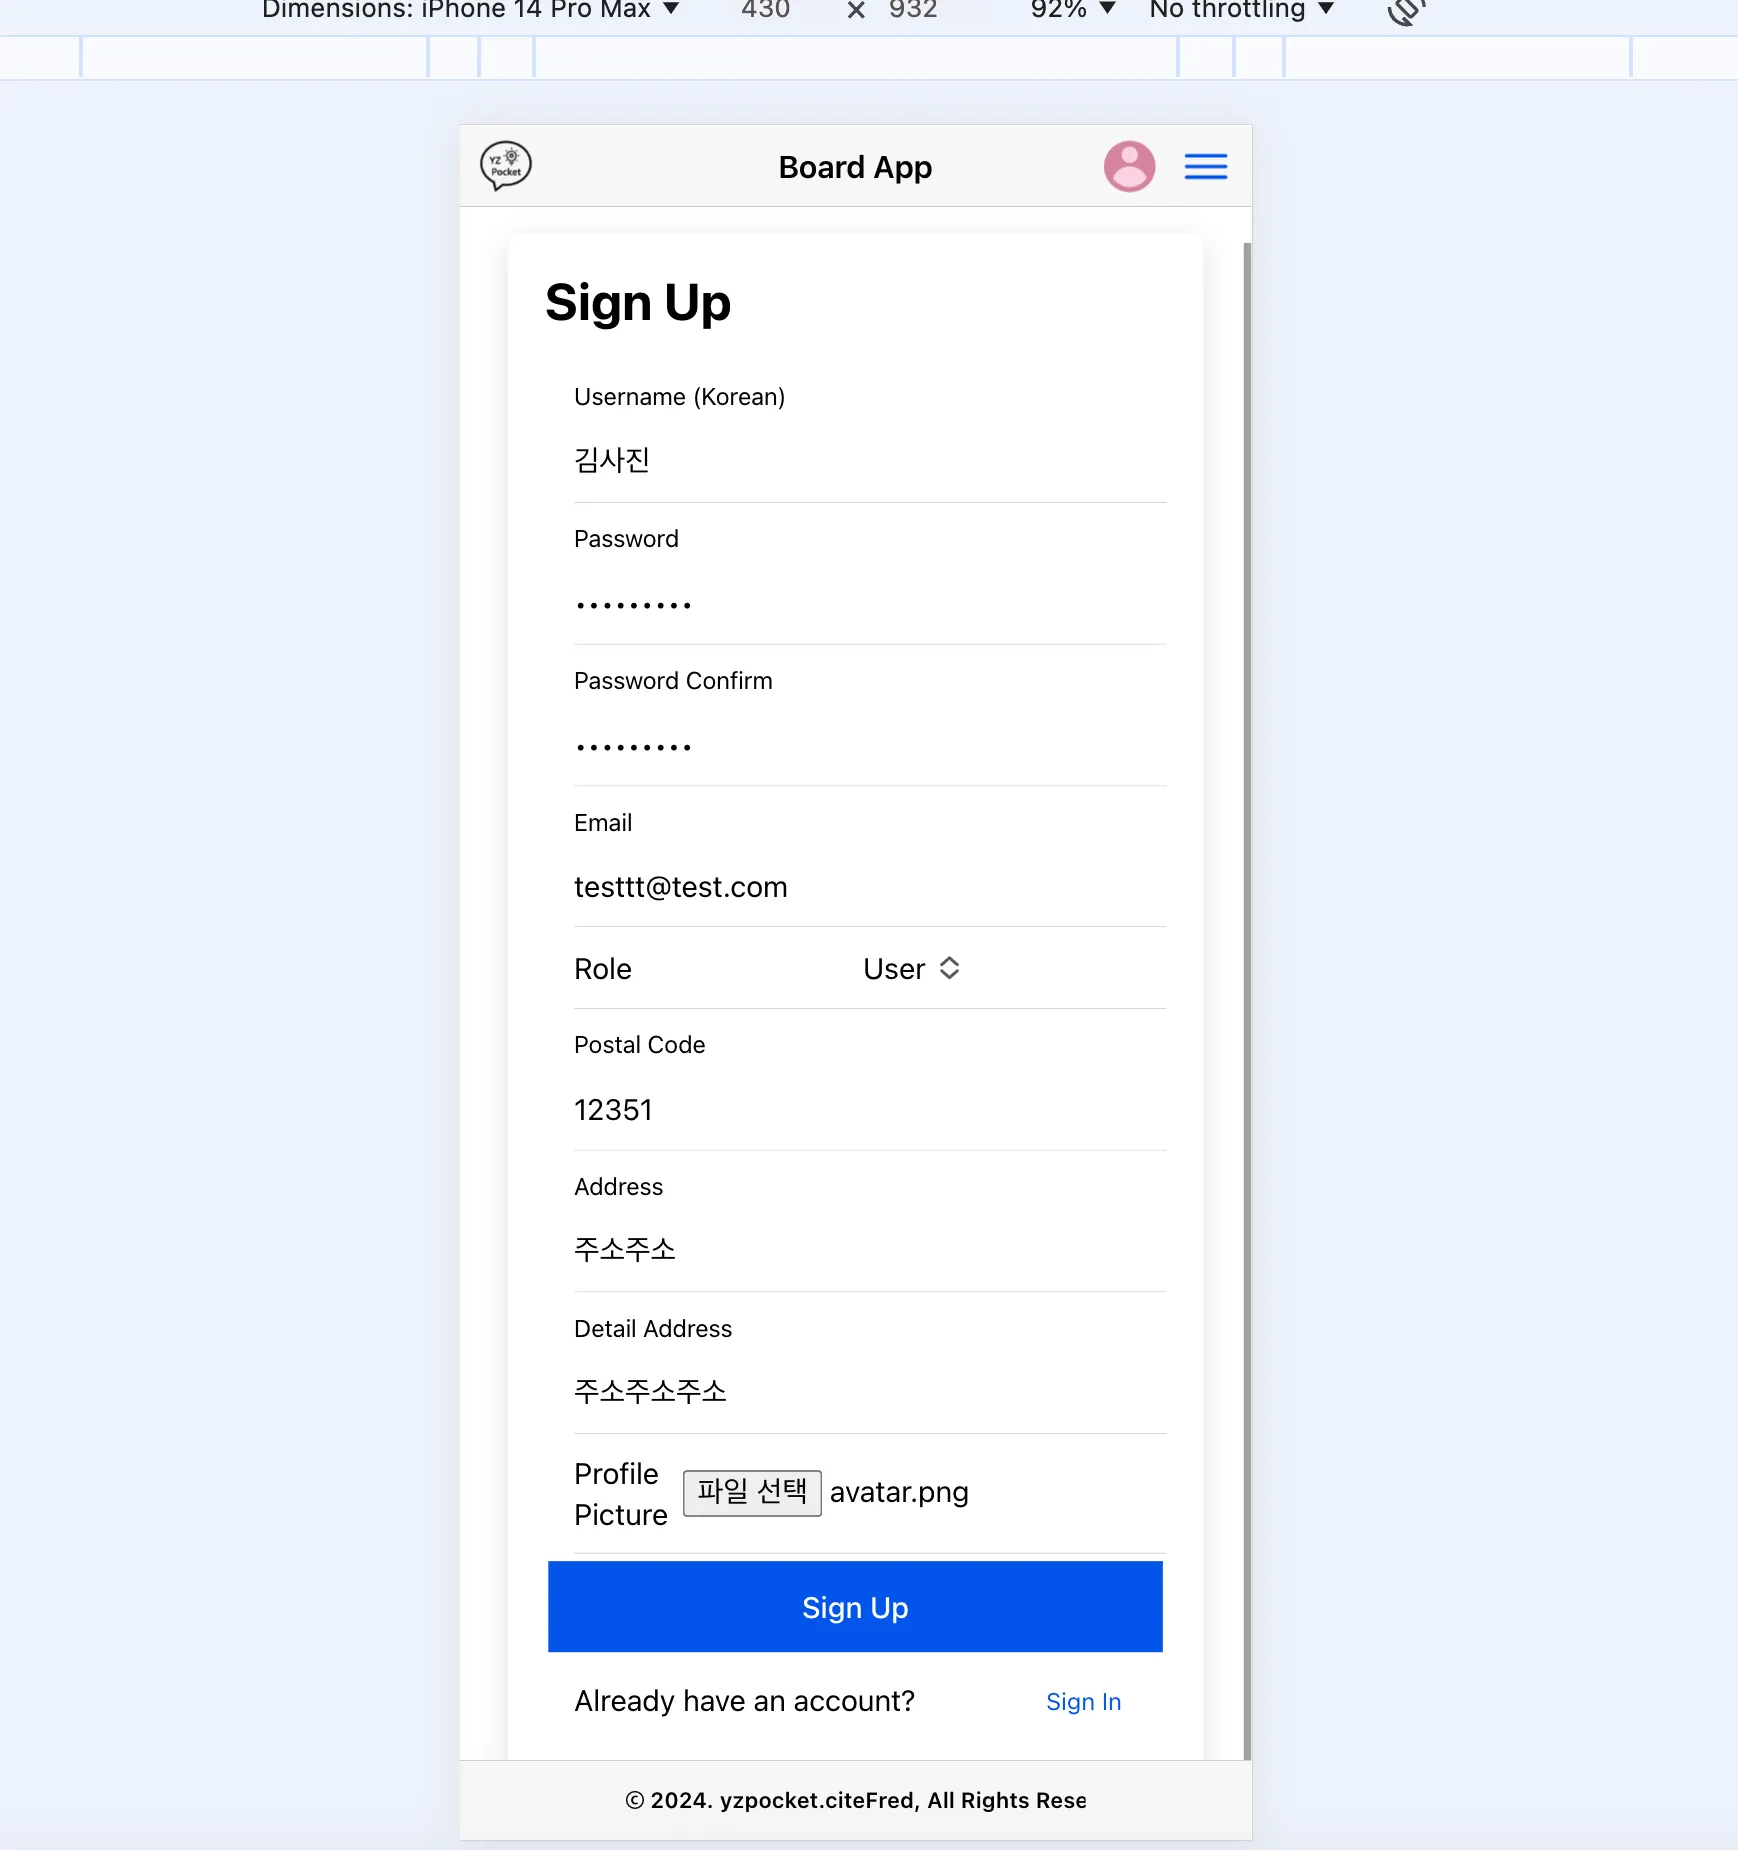
◦
회원 가입 요청 화면
◦
회원 가입 요청에 대한 파일 서버 정적 경로 저장 및 쿼리 실행
◦
DB에 저장된 파일 경로와 즉시 접근 가능한 url 컬럼
4.8.4.2 Frontend
file-response-data.interface.ts
•
API 요청에 따른 응답 인터페이스에 정적 파일 서빙되는 url key추가
import { FileType } from "./file-type.enum";
export interface FileResponseData {
id: number;
filename: string;
mimetype: string;
path: string;
size: number;
fileType: FileType;
url: string;
createdAt: Date;
updatedAt: Date;
}
TypeScript
복사
mypage.component.ts
•
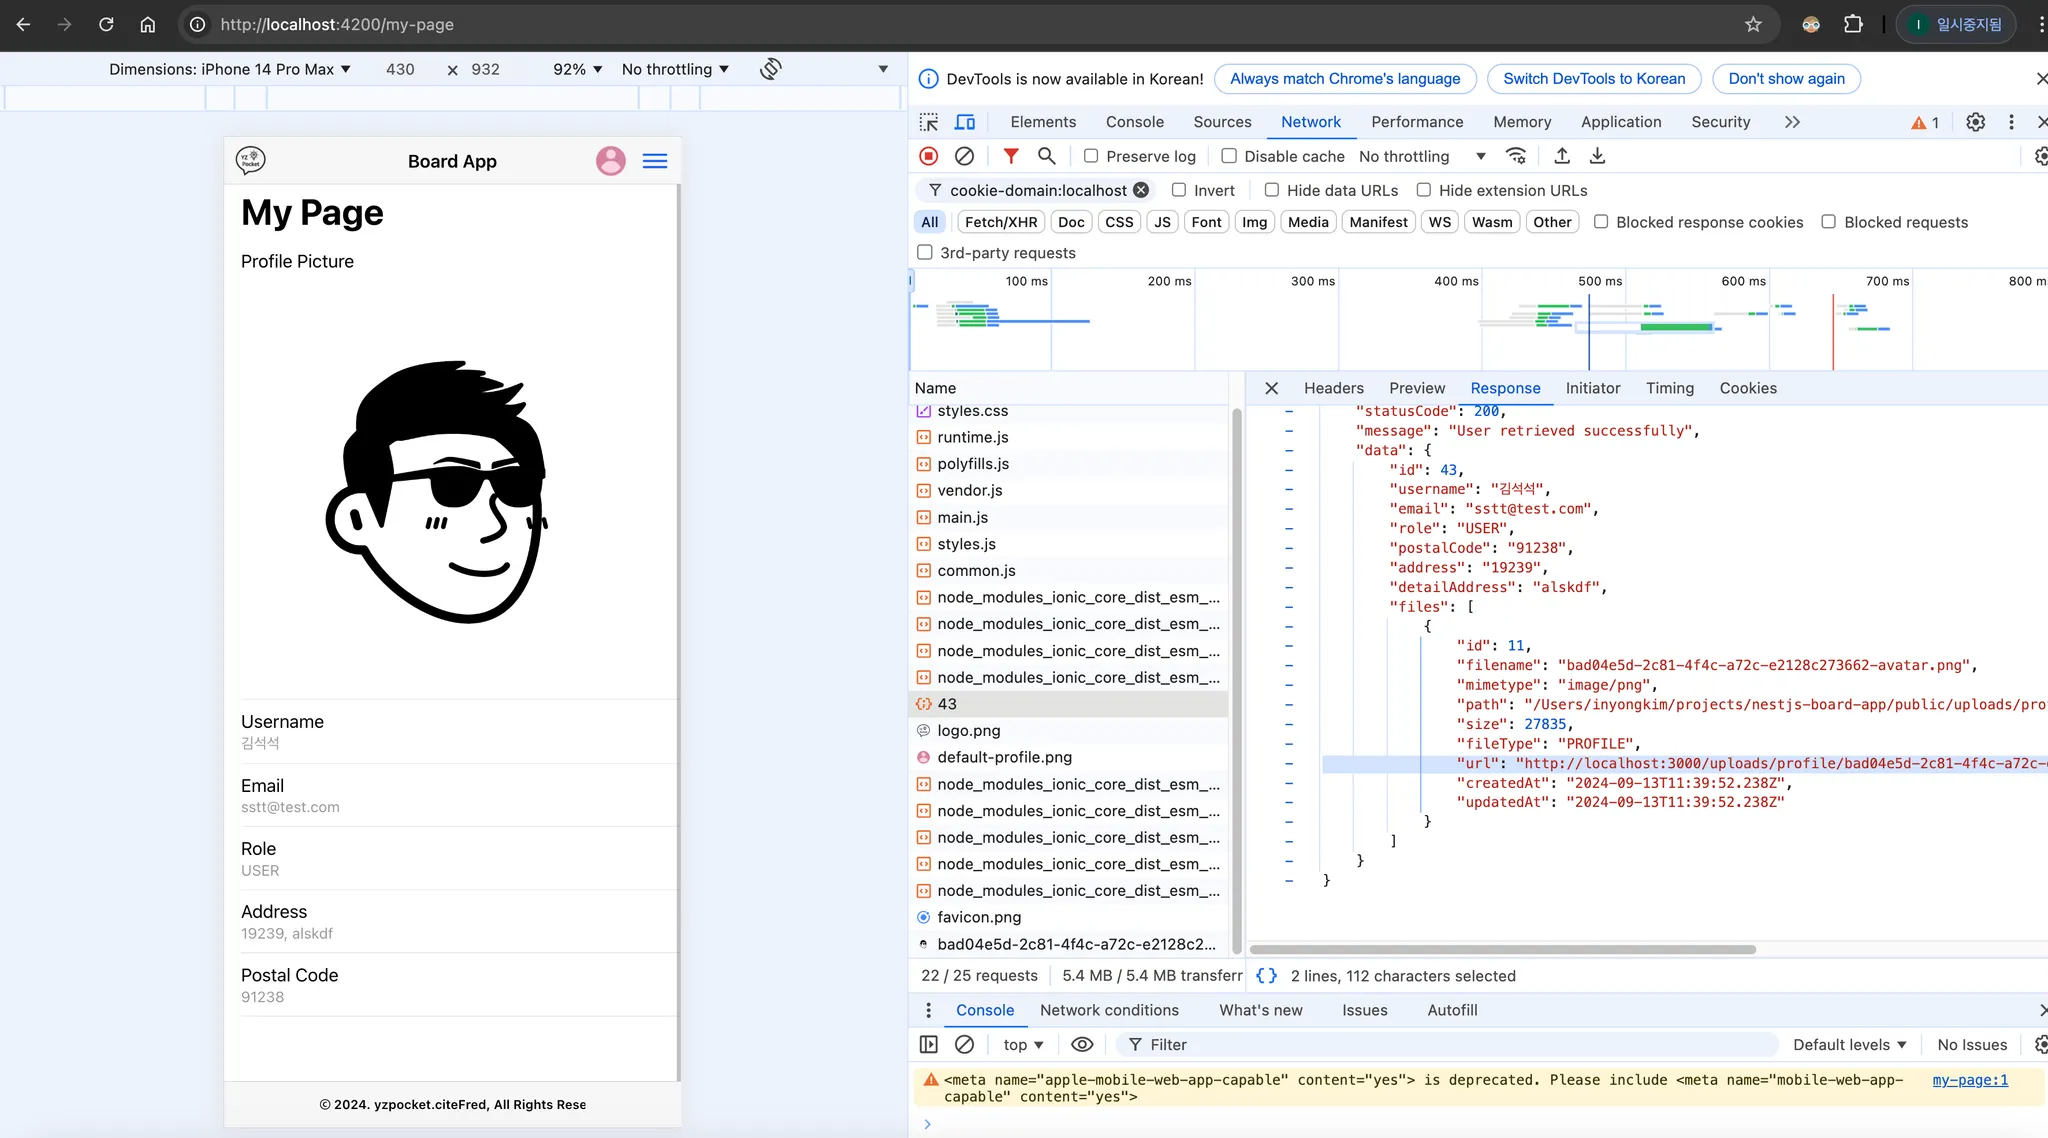
기존 파일의 경로로 받던 profileFile.path → profileFile.url 로 변경
import { Component, OnInit } from '@angular/core';
import { UserService } from 'src/app/services/user/user.service';
import { ApiResponse } from 'src/app/models/common/api-response.interface'; // ApiResponse 인터페이스 임포트
import { UserWithFilesResponseData } from 'src/app/models/user/user-with-file-response-data.interface';
import { AuthService } from 'src/app/services/auth/auth.service';
@Component({
selector: 'app-mypage',
templateUrl: './mypage.component.html',
styleUrls: ['./mypage.component.scss'],
})
export class MypageComponent implements OnInit {
user: UserWithFilesResponseData | undefined;
profileImage: string | undefined;
constructor(private userService: UserService, private authService: AuthService) {}
ngOnInit() {
const userId = this.authService.getUserIdFromToken();
if (userId !== null) {
this.userService.getUserProfileById(userId).subscribe({
next: response => {
if (response.success) {
this.user = response.data;
this.setProfileImage();
} else {
console.error(response.message);
}
},
error: err => {
console.error('Error fetching user:', err);
},
complete: () => {
console.log('Fetching user request completed.');
}
});
} else {
console.error('User ID is null. User is not logged in.');
}
}
setProfileImage() {
if (this.user && this.user.files) {
const profileFile = this.user.files.find(file => file.fileType === 'PROFILE');
this.profileImage = profileFile ? profileFile.url : undefined;
}
}
}
TypeScript
복사
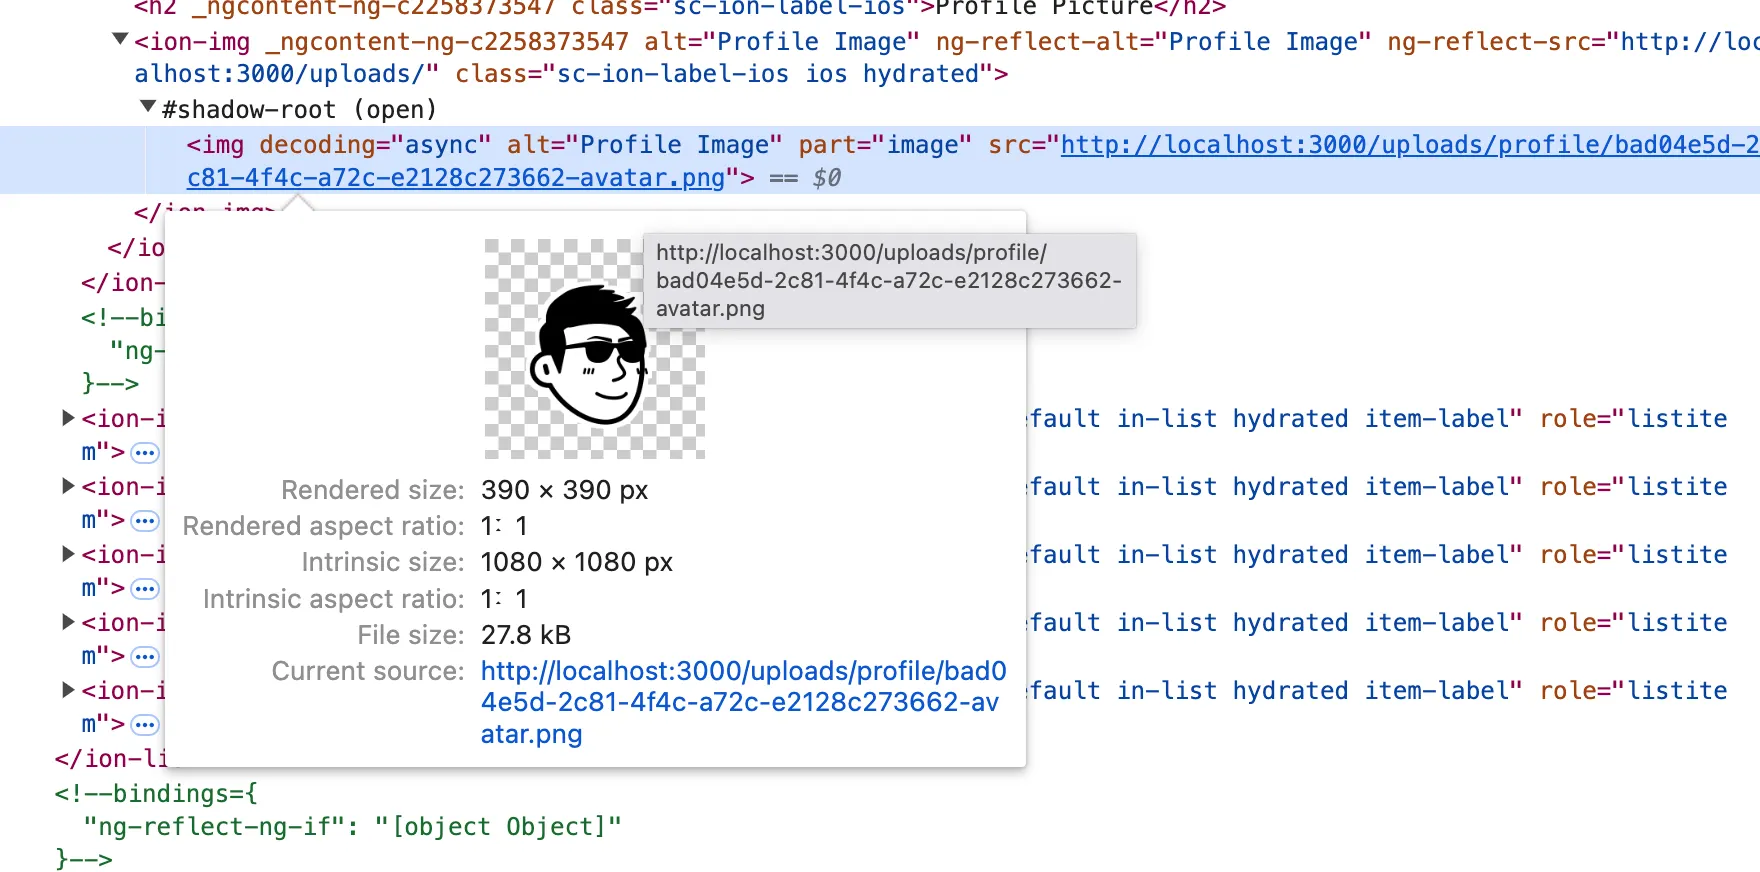
•
브라우저를 통한 테스트
Related Posts
Search